On the 8th October we continued to explore
workshops and we explored the methods and techniques of “Photography”. The
Photography workshop was made up of different group tasks to build up our
skills and knowledge of taking professional photographs with different methods
but also to increase our group and communication skills. As a group we experienced
a range of methods which allowed us to take photographs which related to the “Hands
on Project” but also how it expressed ourselves. I was really curious to explore
photography as I have never experienced professional photography before in a
studio and I wanted to try new skills which will increase my basic knowledge of
taking photographs with my mobile phone and digital camera. The task allowed us
to work independently to create our own ideas and use our own knowledge into
practise when taking photos ourselves in the studio. Als, the task allowed us
to collect new key terminology for our “Hands On Project” glossary pages.
Finally, the task allowed us to increase our communication skills and to work
as a team with different tasks that the whole group hasn’t experienced before.
At the start of the day we used our independent research
skills to find out the definition of key photography terms which were “aperture”,
“shutter-speed” and “ISO”. After working independently, we discussed what definitions
we found and combined our ideas together as a group which allowed to understand
the key terminology further. Aperture is a space which light passes through a
photographic instrument (camera). Shutter-speed is the length of time when the
film or digital sensor inside the camera is exposed to light. Finally, “ISO”
measures the sensitivity of the image sensor within the camera. The lower the
ISO number, the less sensitive the camera is to the light. A higher ISO number,
the more sensitive the camera is to the light. These key terminology, were
useful for the “Hands On Project” as they can be used for the workshop glossary
pages. Also by researching the key terminology it allowed us to increase our
knowledge and to take it into the first task and camera settings we learnt. In
camera settings, we learnt about the key terminology in further detail and how
it effects the photograph when taken in manual photography. Firstly, we learnt
about shutter speed in detail, when the camera is left with more time and light
the image becomes brighter but blurry deliberately which creates an effect. The
process is a still image and a tripod is used to create the blur effect. In
quick shutter speed, it’s a fast moving photograph and freezes an action in
motion. This process is used in sport photography and no tripod is needed as it
is a fast moving process. When learning about aperture further we learnt about “depth
of field” which is the amount of image on focus. If the shutters wide open, the
depth of field becomes brighter and shallow. If the shutters are smaller, the
depth of field becomes darker. With ISO films if the measurement is 100 the
image will be clear which is ideal for taking a photo in the daytime. If the
ISO measurement is 3200 the image will be darker and it will create a grainy image.
After learning in depth about key terminology and learning new keywords we took
them into practise in the first task.
In project one we used natural light and took black and
white images of a variety of hands. As it was the first task I was really nervous
as I haven’t used a camera with the equipment and settings before that we have
learnt previously. With working as a group it gave me confidence as others in
the group felt the same as me with not having any experience with trying cameras
in the studio. This gave the confidence to take a variety of images of hands
which solved the problem I faced at the start. After trying and experimenting
in project one, we learnt about the composition of manual photography and how photography
is an art. With manual photography we learnt about how images should be placed
on a grid so that the viewer will focus on the vocal point of the camera. We
also discussed how photography is an art as it incorporates the elements of
art, leading lines and framing which were also more keywords we learnt in the
workshop. It allowed us to discuss how photography is art and how it can be
expressed and be presented in different methods and techniques through photography.
Through us discussing about the art of photography we moved to project two
which was to take photos that expressed you through the “Hands On Project”.
 |
| Photography studio with black background (low key lighting) |
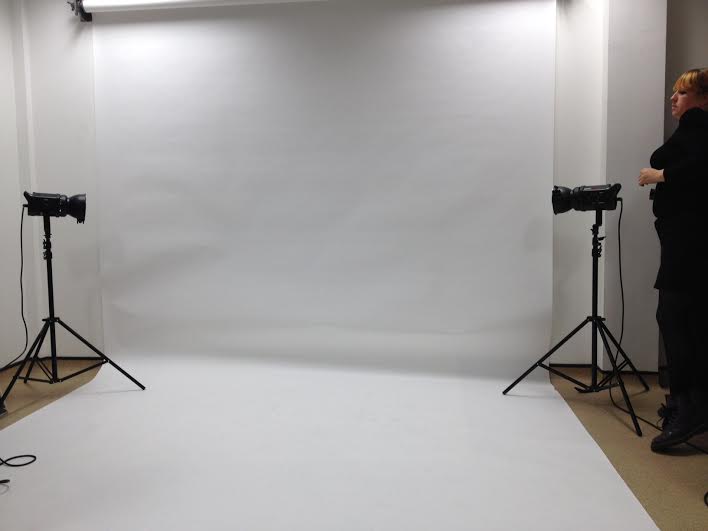 |
| Photography studio white background (High key lighting) |
At the start of project 2 I was struggling to come up with
an idea that expressed me though my hands. To solve the problem I created a
mind map and looked at a variety of materials that were on offer to create an
idea for the photo. I wanted the photograph to reflect what is important to me
so I decided to choose music for the design. To create the photo, I collected
my iPod from my bag and a pair of earphones for the design. A problem I faced was
creating the layout and how music means a lot to me through the design. To
solve problem I tried a range of different layouts and I came up with an idea
that expressed what music meant to me by wrapping the earphones I had around my
arm and iPod.
After creating the idea, the group took a variety of images
of my hand in different positions but still reflecting the layout that I created
and how music expresses me. We also changed the length of the image, the aperture,
ISO and shutter speed to experiment with what skills we have learnt and to use
them independently. I also practised taking photos with another member of the group’s
expression of hands and used different elements that was used on my photos to
experiment with the skills we were taught previously. After completing project
2 and collecting a range of images, we made different diagrams to present the
equipment used and differences between high key lighting and low key lighting
studio areas. The diagrams are presented below. |
| My Final Idea |
 |
| Taking photos using a range of lights and techniques. |
 |
| High Key lighting diagram |
 |
| Low Key lighting diagram |
 |
| Creative light process |
Before using Photoshop we were given a brief introduction of
what we can explore and create with our images. Then we worked independently to
create different effects on our hand images that related to the “Hands On
Project”. I wanted to create the effect that we were given on our brief
introduction so I collected a background that had a paint peeling effect on it
so that the hand image would look like skin was peeling. A problem I faced with
using Photoshop was that I didn’t feel confident with using the software and I struggled
with basic elements through the instructions. To improve next time I am going
to practise Photoshop further and explore the techniques to build up my
confident with using the software. Eventually, I created the design that I wanted
to create independently on the software and the image is presented below. Also,
to improve next time I am going to try different elements and effects to create
more Photoshop designs.
 |
| Design process on Photoshop |
In the photography workshop we were given health and safety instructions
which we followed throughout the task to avoid the risk of injuries. The
instructions are presented on the poster below.
 |
| Health and Safety instructions in the photography studio. |
No comments:
Post a Comment