Friday, 27 May 2016

24th May Creating My Final Tree Layout And Surface Of My Squirrel Character


On Tuesday 24th of May I continued to create my final project piece for “Unit 8” Structures” through creating a final tree layout and starting to build up characters within my piece. Building up the characters involved creating features and textures within the layout of the animals that were going to be placed onto my piece. In the studio practise, I decided to focus on my “squirrel” character as it is placed within the foreground of my piece and involved a variety of elements and textures within the design. The design layout included the texture of fur and different colours within the body which all combined together to create my final character outcome. To recreate these elements I explored different paper cutting techniques and materials to achieve this. The task allowed me to continue to develop my confidence with paper cutting skills and layouts by creating a final feature element for my background piece. Also, the task allowed me to adapt my paper skills through re-creating more intricate details and textures within the characters of my piece. By completing the task, it has allowed me to experiment in further detail about paper cutting and combine my knowledge and ideas to create new character layouts. The task allowed me to explore within a new element of paper cutting through working into a large amount of surfaces and textures which gave a unique outcome. Overall, the task was useful because it allowed me to demonstrate the ability to plan, organise and develop my final project for “Unit 8 Structures”. Finally, the task allowed me to apply practical skills and theoretical knowledge and understanding to complete my final project.

To start the task, I decided to complete my final tree layout for my last section within the suspended shelf for my project. For the measurements I continued to make the height accurate for my paper cut scene and used 60cm for the piece. The length of the piece was 5cm because I continued to create an effective background which includes the scene moving into the distance. After creating the measurements, I decided to design the surface of my design which was tree surfaces. I felt confident when creating the layout of my design as I have developed my skills throughout the project and produced several tree pieces for the background of my piece. However, I continued to be less confident with cutting the piece out as it was an intricate design which is easily breakable when working to the layout. When working into design, I did face minor problems with the layout as I broke some parts of the pattern design with my craft knife. I overcame the problem and I will continue to develop my skills throughout the project but also gain confidence from this. After completing the background piece, I focused creating my “squirrel” character which is featured on the foreground of my piece.

To create the elements and features for my “squirrel “character, I decided to collect my secondary research images of the animal and observe the colours and textures of the layout. I found collecting these images useful as it allowed me to identify what features and elements I needed to include. For the texture, I noticed that a variety of colours and different shades were built up together in the fur and within the tail. To recreate this, I collected a large amount of colour card strips and started to build up the body and tail which became successful as I believe the collage matched the original image. Also, within the images I noticed that striking shades were on the layout of the animal. To re-create this I cut out pieces of large card and built them up together to create surface I was wanting to achieve. Finally, for the texture I decided to work and scratch into the surface in order to achieve the surface of fur. Throughout this task, I was nervous to explore the character as I haven’t worked into layouts that were really small and intricate. However, I developed my confidence which will be taken further into my project as I will be creating further intricate paper characters. Overall, I enjoyed creating the character as it allowed me to include features and characteristics within my design which will make my final piece more engaging for the audience.
 

Next, I am going to continue to create further characters of my final piece which will include a “stag” with a variety of textures and surfaces.

Creating My Shelf


To create my shelf for my final project piece, I decided to measure out my final idea which has been developed from my original maquette structure. For the length I decided to keep it as 60cm because I believe its suitable size for my final piece and I can include a variety of intricate details throughout the piece. Also, I have decided to keep the same height because I think that the size is large enough for the piece to work effectively but also create intricate details for each individual layer. For the sections of my shelf I decided to change my original 3 different layers which included a background to 5 layers with a background. I decided to change my original maquette layout because I believe that it wasn’t effective and I felt that it didn’t achieve the effect I was wanting to create with the build-up of my work. Also, I decided to change my layout because I wanted to include more elements within the design such as trees to make my final piece more effective. Finally, I decided to include more layers because I wanted to emphasise each individual elements I will create for my final piece and present the suspended layout technique. For the distance between the layers, I decided to keep it the same measurement as I believe it creates the suspension effect I am wanting to achieve and identifies each element within the piece. The distance between each section is 15cm and this is repeated through the layers.

Once the shelf was created, I decided to sand the piece down as the material had an uneven surface. Throughout the task I followed health and safety instructions in order to avoid the risk of injury. I used sand paper to smooth the surface down because there was a risk of injury when handling the piece. After sanding the piece down, I decided to paint the shelf the colour white as it would match my studio space and exhibition. This colour was chosen to camouflage the piece into the background and also to emphasise my final piece. Also, this colour was chosen because I wanted to create the suspension effect and emphasise the overall layout of my final piece. Once the piece was painted, It was ready to be placed in my exhibition space to suspend my work.


19th May Creating The Second Layer Of My Piece And Character


On Thursday 19th of May I continued to complete my final piece for "Unit 8 Structures" which is a large, woodland paper cut scene. I continued to work into my scene through completing the next layer of my piece by creating tree trunks and editing the sizes. Also, I continued to work through my scene by completing the second layer element of my design that includes a layout of a squirrel. By completing this task, it has allowed me to develop my paper cutting skills and adapt them to create a large scale piece. Also, the task has allowed me to develop my knowledge with using my final material and also allow me to gain confidence throughout the task to create my final outcome. By completing the task it has allowed me to demonstrate my knowledge and thought process whilst completing this project and representing it though my final piece. Also, the task has allowed me to explore a new element within my task which is creating animals through paper cutting and presenting the features within this technique. Overall, the task has allowed me to demonstrate the ability to plan, organise and develop my final piece for "Unit 8 Structures". Finally, the task allowed me to continue to apply practical skills and theoretical understanding for my final project piece.

To start the task, I continued to create to complete my second layout of my final piece through cutting out the surface pattern of my tree trunk design. I found creating this layout easier than my previous foreground tree pattern because I have gained confidence with developing the surface and adapted my paper craft skills in order to fit my final piece. Throughout the task, I have followed health and safety instructions to avoid the risk of injury whilst creating my final piece. I continued to use a cutting mat to avoid the craft knife damaging the surface. Also, I continued to place my hand away from the cutting knife to avoid the risk of injury when cutting pieces out for my final piece. All these instructions were followed throughout the task. Once I completed my tree trunk surface, I focused on creating the next layer of my work which involved further paper cuts of trees. A problem I faced when completing my design was that I didn’t have enough resources and materials to complete my squirrel surface layout. I will complete my squirrel character further along into my project.

To create the next layout of my design, I measured out the elements for the pieces I was going to create. As I continued to create the next layer, I wanted the scene to move into the distance which would reach my background so I made the measurements of my elements smaller. For the height I continued to create the pieces at 60cm as it would be at equal length. However, for the length I measured the pieces at 10cms. After measuring the length I worked into the surface and created the texture on the tree surfaces. I continued to be inspired by my previous research and I developed my ideas to create individual tree surfaces. After creating the layout, I started to cut into the surfaces and develop the texture I was wanting to create. A problem I faced when cutting out the surface of my design was that the pieces were very intricate which made it difficult for me to cut out. By the pieces being intricate, some of the surface was damaged through the equipment I used. However, I gained confidence with creating the layout and I completed the next layer of my final design. The layer is presented below.

Next, I am going to create the next layer of my final scene piece and start to create characters for my project which will include the squirrel and woodpecker design.

17th May Creating The Foreground Section For My Final Piece


On Tuesday 17th of May, I continued to complete my final project piece for “Unit 8 Structures”. In the studio practise I decided to create my foreground element for my “structure of nature” scene as I believe that it will help me to build up the piece up more accurately with measurements and placing the design within my shelf structure. Also, I decided to create my foreground piece as it will allow me to work large scale and create more intricate details which will take more time but also be completed in the studio practise day. Finally, I decided to create my foreground piece as I believe that I gained confidence previously from my large background piece to create my detailed foreground piece. The task allowed me to develop and adapt my skills I have used previously when creating my final piece to create another element for my final design. Also, the task allowed me to transcribe my final idea from Marquette, sheet work and sketchbook work to create my piece. By continuing to complete my project piece, it has allowed me to demonstrate the ability to plan, organise and develop my ideas for my final outcome. Finally, by continuing to complete my final piece it has allowed me to apply practical skills and theoretical knowledge and understanding to my final project.
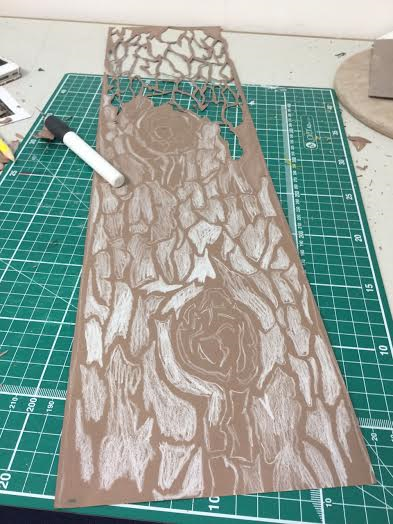
To start the task, I decided to complete my last specific details for my background piece as it would be ready to be placed onto the shelf within its accurate measurements. The specific details on the background included patterns within the path and tree trunks. I found completing this task challenging as I have been cutting into large pieces within the piece and haven’t focused on small intricate details. However, I overcame this problem and gained the confidence to create these small elements and complete my final background piece. The outcome of the design is very intricate and delicate to hold so I will take this knowledge further into my project when I am placing all of my elements together carefully. After completing the piece, I focused on creating my foreground piece which is a tree trunk and woodpecker. When measuring the piece out, I decided to create my wood pecker separately which is different to my marquette because I wanted to make the bird more accurate and present my paper craft skills further. I wanted to present my paper craft skills further through etching onto the surface of the bird and placing all the colours that represent the woodpecker. To create my tree trunk, I measured my piece 15cmx60cm because my overall background height measured at 60cm. I decided to create my length at 15cm because I believe that it is a large piece to create my surface but also continue to show elements of my background. After safely cutting the measurements out, I started to create my design surface pattern. A problem I faced when creating the pattern was that pencil didn’t show up on the surface colour “mocha”. To solve the problem I used a white pencil to draw out my design onto the surface which made the lines easier to identify when cutting the layout out. When drawing my layout, I was inspired by tree surfaces from my primary and secondary research and development I have collected throughout my project. I found creating the layout challenging as I had to consider the proportion and scale for my work as it was a foreground piece of my design layout. However, I overcame this problem and created an accurate layout for my final piece. When cutting the layout of my piece I followed health and safety instructions throughout the task. I used a cutting mat and metal ruler to avoid damaging surfaces and avoiding the risk of injury to my hand. Also, when cutting out my design with a craft knife, I placed my hand away from the blade to avoid the risk of injuries. These instructions were maintained throughout the task. A problem I faced when cutting out my design was that the piece included intricate pieces that were damaged easily with my craft knife. However, I overcame the problem and used glue to repair my broken pieces and combine them together to create my original design layout. The final outcome is presented below.


Next I am going to complete another tree trunk element for my final piece that will be placed on the second layout of my shelf scene. Also, I will be creating woodland animals that are included within my design.

.Exploring The Technique "Suspension" In Further Detail


I decided to explore and experiment in further detail the "suspension" technique through completing another 3D paper cut scene. I continued to use images from my primary research to achieve this technique and I also decided to make the piece small scale to see if it would work effectively. Previously, I worked with A3 size to complete my paper cut 3D suspension piece. The outcome was very effective and created a 3D scene that looked different through a variety of perspectives. I have decided to work to the size A4 to experiment if the size of paper is more effective at different scales and also to develop my knowledge of using this suspension technique further. I continued to use this technique as I found the piece more effective and presents the intricate paper cutting details from a variety of angles and perspectives. Also, I continued to use this technique as I have explored a variety of methods to present my work previously and I believe this element is the most effective as the layout presents all the paper cuttings and scenes more effectively which combine together to create a detailed outcome. This technique was developed further compared to the other designs because they didn't present the paper cutting pieces effectively as they were damaged easily and displayed through a table. The advantage of creating a shelf is that my paper cutting pieces are safely displayed and suspended so that they will not be damaged when they are put on display. However a problem I faced when placing work on display through this technique is that I found it difficult to attach the pieces together and I believe the material I used wasn't effective as it can be seen when displayed. I will continue to develop and experiment with materials to find out which is the most effective to be displayed and attach the pieces safely together. By continuing to experiment with this technique, it has allowed me to demonstrate the ability to plan, organise and develop how I am going to present my work for my final project.


To create my paper-cutting piece, I printed an image from my visit to the Lake District which was a wetland environment scene. I decided to use this image as I could identify a variety of layers which I thought it could be developed and created into a 3D scene. Also I decided to use this image as I believe I will be inspired by the research to create my own initial designs for my final piece. Next, I photocopied the image twice to create 3 layers and transferred them onto card. Previously I found placing the images onto card not effective as it caused the layout to break easily when the design is being cut out. This has been demonstrated again through this experimentation which caused the layout to be less effective overall. To improve next time, I will continue to develop my ideas further and explore an alternative paper-cutting technique which will create an effective outcome within the suspension technique. After cutting the layout out, I placed the elements together and measured out where I needed to create spaces to place my material to suspend. I continued to use string for my suspension technique as it a strong material which can hold the weight of paper safely. However, a problem I faced with the string was that it could be seen when the outcome was placed on the shelf which made it less effective to the piece. To improve next time, I will continue to explore materials in further detail and find a suitable transparent material to hold my work safely.

Overall, I was pleased with my outcome as it created a 3D paper-cut scene and continued to look different from a variety of angles and perspectives. However, I believe that working with a bigger paper scale is more effective as it presents the intricate pieces within my work in more detail compared to the A4 size. I will develop the information and research I have collected from this experiment further into my project.
Video Link- https://www.youtube.com/watch?v=KSC31ibNy4U&feature=youtu.be
All the images are presented below.


12th May Creating My Background Piece


On Thursday 12th of May I continued to create my background layout for my “Unit 8 Structures” final project piece. The task involved creating my background layout which included cutting out my tree designs and starting to work into my path layout for the piece. I was nervous to create my path background piece as it is an important element within the design as it starts from the background and travels towards the foreground which will hold my “stag” character in place. The layout has been developed from my design sheet and the Marquette I have previously created. However, I am working towards a larger scale and this has been measured out accurately in the previous studio practise. I continued to develop my paper-cutting skills within the task, to create a large scale piece and also achieve intricate details within the design. By completing the studio practise, it has allowed me to continue towards completing my final project piece for “Unit 8 Structures”. Also, by completing the task, it has allowed me to develop my understanding and skills I have learnt and adapted from this project to create my final project piece. The task has allowed me to demonstrate my understanding and knowledge I have learnt throughout the project to complete my final project piece which demonstrates the progress I have achieved. By completing the task, it has allowed me to continue to develop my paper-cutting skills and techniques in order to achieve an accurate background piece. The studio practise has allowed me to demonstrate the ability to plan, organise and develop my final project piece. Finally, the task has allowed me to apply practical skills and theoretical knowledge and understanding to complete my project piece for “Unit 8 Structures”.

To start the task, I collected a large cutting-mat which was the surface for my paper-cutting process. Health and safety instructions were followed throughout the task in order to avoid the risk of injury to hands. I continued to place my hand away from the cutting knife and I used the cutting-mat to allow the knife to be safely through my design. All the health and safety instructions were followed throughout the task. To continue with the design, I decided to complete the tree outlines that weren’t completed in the previous task. I believe that I have gained confidence with cutting the trees out as I have developed my paper-cutting skills and created a technique which allowed me to achieve the intricate details within the piece. However, I did face some minor paper-cut damages to my design but it didn’t affect the overall appearance of the layout. After completing the trees, I focused creating the path background of my design. I was nervous to start the task as it was the most important element of the piece as it will be placed within the centre and work towards the foreground from the background. I was also nervous to complete the task as it included intricate details within the path layout which can be easily damaged when worked into the piece. However, I continued to work into the piece and started to create the background piece of my design. I started to paper-cut the intricate details first within the design path as I believe they were the most difficult pieces to achieve and the most likely to be damaged. I developed my confidence when completing the intricate details and I started to work into the outline of my path piece.
 

Due to a visit to a local art gallery, I was unable to complete my final background layout piece. Next, time I will complete the final elements and details of the background piece and start to create my foreground pieces.

10th May Creating My Background Layer For My Final Piece


On Tuesday 10th of May, I started to create my final project piece for “Unit 8 Structures”. The studio practise involved creating my first background layer which incorporated the design layout of trees and a path. I was nervous to create this piece as I haven’t worked on a large scale to recreate my piece as the original Marquette design was created through the A4 size. However, I was prepared for the task as I have practised previously and created a final layout which involved measurements and my shelf. Also, I was prepared to create the final piece, as I have used the material previously within my design sheet to create the layout I was wanting to achieve. I was curious to start the task as I was wanting to see if my design layout will look effective in large scale as my previous exploration of the “suspension technique” concluded that working towards a bigger scale creates a more effective 3D paper-cut scene. By completing the studio-practise, it has allowed me to develop my skills and understanding I have learnt from this project to create my final project piece. Also, by completing this task, it has allowed me to demonstrate my project progress through research and development to create my final piece. I have adapted my paper-cutting skills and techniques to work towards a large scale piece for my final project “Unit 8 Structures”. By completing this task, it has allowed me to demonstrate the ability to plan, organise and develop my final project piece. Finally, by completing this task, it has allowed me to apply practical skills and theoretical knowledge and understanding to complete my project piece for “Unit 8 Structures”.


To start the task, I collected my material “Forest Green” card and measured out the background I am wanting to achieve. To relate my design measurements to the layout of my shelf, I continued to keep the length at 60cm and the height at 60cm. This would allow my piece to fit into the shelf measurements accurately and also look effective when placed on display. Also, I decided to use these measurements as I believe that I will be able to work at this large scale piece in order to complete my design. To make my measurements accurate, I decided to use a paper-cutter in order to achieve a straight line and effective measurements to place my design layout onto the material. After creating the background, I started to create my design layout trees. I was nervous to start the task as I was worried that I would make a mistake which would affect the overall design. However, I overcame this problem and I started to create the layout. A problem I faced with the material was that when I was drawing with a pencil it wouldn’t be presented effectively within the surface. To solve the problem, I collected a white pencil and continued to work into the design layout which gave an effective outcome within the sheet. I was really happy with the outcome of my trees as they were the right size I was wanting to achieve but also effective as I placed the correct number I was wanting to draw within my layout. Next I focused creating the path which I believe was difficult to achieve. The path within the layout moved from the background towards the foreground. I found creating the layout difficult to achieve as the layouts were inaccurate when I started to draw the basic layout. However, I overcame the problem and after a couple of attempts I created the path layout I was wanting to achieve. After, drawing the elements and details within the path, I was ready to paper-cut my design. For my paper-cutting I continued to follow health and safety instructions throughout the task to avoid the risk of injury. I collected a large cutting-mat as I was working at a large scale and avoided the risk of injury when working into the layout.  When working into the design, I placed my hand away from the craft knife to avoid the risk of injury when cutting the pieces out. All these instructions were followed throughout the task. When cutting my design out, I found it difficult at the start of the task as the increate pieces were hard to achieve accurately which caused some damages to my original design layout. However, as I continued with the task I started develop my confidence and I used my paper-cutting skills to cut the background trees out accurately.


Due to time-management, I was unable to cut my final background layout out which included a couple of trees and the path design. Next, I am going to achieve my background layout which will be ready to be placed onto the shelf.