Monday 21 December 2015

15th December Exploring Target Audience


On Tuesday 15th December we continued sketchbook work in studio practise for the "Distinction Doors" live brief. The task allowed us to analyse the requirements and parameters of a 2D problem in art and design. Also, the task allowed me to apply research activities to support solutions for the project. Finally, the studio practise allowed me analyse the effectiveness of solutions to 2D problems in the project. In the studio practise I decided to focus on completing my target audience page as it would support my starting research for the project.

To start the task I analysed who the target audience is for the company "distinction doors". The information was collected from the live brief we were given. Firstly the target audience is both male and female aged 25 plus. The homeowners are hardworking and take pride in their homes. Also the target audience like to research a product before they make a purchase and have a premium quality product. Possibly the target audience may have a new modern house of renovating their existing home. The audience will be style conscious and will like to stand out from the crowd and set the trend rather than follow. Finally the target audience may possibly read ideal homes magazine and watch grand designs. All the points above were placed onto my target audience page. After analysing the "live brief" I decided to collect images from my independent research to match all the points above and make the target audience page look visual.

 I used images and sketches to match all the points highlighted in the brief. For "ideal homes" point I collected magazine covers of the title and also "grand designs" magazine as I believe that the target audience would also read it. To represent "modern home" and "renovated existing house" I collected a variety of images of buildings that relate to these points which have been inspired by "grand design” episodes. To match the quote "stand out from the crowd" I collected an image that I believe represented what the target audience would like. After collecting the images I placed them onto my sketchbook page and collaged them in a layout which I took inspiration from the PowerPoint we were presented at the start of the project.

When creating the mood board I collected information from the company about what colours and glass finishes does the target audience like. It was important to collect market research because it allowed me to analyse the requirements and parameters of the project. Also by collecting market research it allowed me to apply research activities to support solutions in the project. I found out that the most popular colours are "duck egg" and "chartwell". Finally the most popular glass window finishes are "Java" and "Sulu". I will be focusing on these colours and finishes throughout the project as they are the most popular features from the target audience. Also I will be focusing on these features because I am wanting to create a range of contemporary doors and one standard door that the target audience will like and relate to the brief. After creating a collage I created a variety of sketches on the sheet to show my understanding of each point I am aiming to achieve and make the page look visual. Finally I annotated the page to symbolise each point I am making on the page.


Target Audience Sketchbook Page

Wednesday 16 December 2015

Caro Final Evaluation Part B


When creating my final 3D sculpture in the project, I faced many difficulties that effected my final design layout and appearance. However, I overcame these difficulties and solved them which allowed me to create a final “table-top” 3D sculpture that was inspired by Caro’s work and my research throughout the project. Firstly, a problem I faced with the design was that the “Ceramic Base”, which was on the original design layout, wasn’t strong enough to hold the piece together and the base became uneven after being taken from the kiln. To solve the problem I changed the design layout and constructed a plywood base that was placed underneath the ceramic base to make it stronger. Also to solve the uneven surface I placed glue underneath the uneven areas to make them balanced and also stick to the plywood surface. Another problem I faced was the placement of the ceramic tubes on the design. According to my original design they were going to be attached together to create a staircase effect and become free-standing on the base. However, I faced difficulties as the tubes weren’t strong enough to be connected together and had uneven surfaces from the kiln. This had an impact on my final design but it was solved by making the whole piece stronger. A plywood platform was created to place the 3 ceramic tubes together and also keep the same idea of creating a staircase. The design change related to my previous research and development so it overcame the problem I faced. Another problem I faced was that I had to change my layout to my final design from my sketchbook work because it would impact the sculpture that was created. I decided not to create a steamed wood piece to wrap around the base because it would damage the strong plywood stair case and have the risk of damaging the sculpture. To solve the issue of where to place my print-making I placed the design onto my ceramic base which gave an effective layout. Finally, another problem I faced when creating the sculpture was that I couldn’t place wire through the sculpture because the ceramic tubes were very fragile and could easily break if a drill was placed into the surface. I have found assembling my sculpture very challenging because I had to change a large majority of my final piece in my sketchbook to create the 3D sculpture. By creating the sculpture, I found some specific elements challenging as I was skill developing my knowledge of machines in the workshop. However I found separate elements in the workshops easy to create because I focused on individual pieces than a large final piece. If I had to change any aspects of the project I would have created a simpler design as it was very difficult to create a complicated piece that had a range of elements placed into one sculpture. Also, I would change the layout so that it allowed me to create an easier design that I could construct without making any changes. Finally, if I had to repeat the project I would ask specific subject teachers for more information about the final layout and create a final sketch that would be taken into the workshop and be created without any issues. Overall, I am happy with my final sculpture because it has demonstrated the different elements I have made in each workshop and how I have assembled them together. The sculpture shows a variety of skills and methods I have used throughout the project and how it connects to my research and development in the project. Also, the piece has demonstrated my exploration of different materials and methods. Finally, I am happy with my final sculpture because it has become a strong 3D “table-top” sculpture that presents my development of the project and my “transcription” of Caro’s work.

My final sculpture is presented below.

8th December Studio Practise and Caro Final Piece


On Tuesday 8th December I started to explore my new live brief “Distinction Doors” through sketchbook work and mood boards. Also in studio practise, I went back to complete my 3D sculpture for the “Transcribing Caro Project” that was incomplete from the previous workshop task. By completing the sculpture for the “Transcribing Caro” project, it allowed me to apply practical skills, understanding and methods to solve 3 dimensional problems in art & design. By starting the sketchbook work for the “Distinction Doors” live brief it has allowed me to analyse the requirements and parameters of a 2 dimensional problem in the task. Also the studio practise has allowed me to apply research activities to support solutions to a 2 dimensional problem in art & design. Finally, the studio practise has allowed me to start demonstrating the ability to plan, organise and prepare solutions for the project. I was excited to explore the new project and explore the theme “Let the outdoors in” and research what doors are already in the “Distinction Doors” catalogue. The task allowed me to use my research skills to collect a variety of secondary research for the project.

To start the research for the “Distinction Doors” brief I used my independent study skills and started to create boards on my Pinterest page. To start my research I decided to collect images for the theme “Let the outside in”. I believe that this quote relates to nature because I think the keyword “Outside” relates to the environment around us which is nature. The theme “Nature” has a wide variety of elements inside the topic so to start the task I looked on Pinterest that had the tag named “Nature”. After creating a variety of images that matched the name, I developed my research further and started to focus on images that were “Flowers”. I decided to focus on flowers because they present a variety of colours, shapes and also matches the theme “Let the outside in”. I also decided to use these images because I believe that this initial design idea can be placed onto door designs when I start to develop them. After collecting images, I printed them off and started to place the “nature” images into my sketchbook pages. Then I focused back to the “Transcribing Caro” project and went to the 3D workshop to complete my design.

For the "Transcribing Caro" project I needed to complete my 3D sculpture that was incomplete from the previous 3D workshop. The task allowed me to apply practical skills, understanding and methods to solve 3D problems in the project. To start completing the sculpture, I attached the last ceramic base onto the platform by using a drill to attach the piece of wood underneath securely so that the ceramic piece will be held and not break. Then I started to glue first ceramic base onto the ceramic surface to make the sculpture stronger and to avoid the whole fragile piece collapsing. Once the glue was placed I faced a problem with the design as the whole piece wouldn't stand freely whilst the glue is drying. To solve the problem I collected a spare piece of wood and measured the length of the final platform from the ground so that the piece would be slotted underneath to hold the piece together. Then I measured the length out and cut the piece out on the band saw. The piece held the sculpture securely and would be removed when the glue is set. Next I focused on creating the pattern on top of the column which was going to be made from plastic. I wanted to colourful pieces of plastic to match Caro's work as he uses these colours. I decided to collect the primary colours that were blue, red and yellow for my design and measured out how big I wanted the pieces to be. I decided to create layers because it related to the architecture buildings I found whilst researching renaissance paintings. For the measurements I decided to have 10cm for my base, then 7.5cm for my second piece, 5cm for my third piece and 2.5cm for my final piece. All of these measurements were cut by the band saw. To develop my knowledge of using the band saw I placed a piece of wood underneath the plastic to create a smooth cut through my piece. Eventually I created my pieces of plastic and placed them onto the design with superglue that was set to dry overnight.

All the Ceramic tubes placed together

The primary plastic colours I used.

One final pattern that was placed onto the ceramic tubes.

Tuesday 8 December 2015

3rd December introduction to Distinction Doors


On Thursday 3rd of December we started to explore the brand new live project “Distinction Doors”. The project is a live brief and the task is to design a 3 limited edition contemporary doors and at least one standard door. The designs must have glass panels and have instant visual appeal from the exterior of the door and interior.All the designs I create must match the theme “Let the outside in” and have the “Wow” factor as the original doors are lacking this appearance. For the first time in a project we have a target audience who are both male and female aged 25 plus. The audience are homeowners who take pride in their homes and they will be style conscious. Also the audience want to stand out from the crowd and become the trend setters. Possibly, the audience may have a modern, new house or renovating their existing home. Finally, the audience may read ideal homes magazine or watch grand designs. The target audience will be considered throughout the project and I will be relating my design work to them. Also in the project I will be presenting my designs to Distinction Doors company and my peers on Thursday 19th January 2016.My presentation must cover my approach to the project, my research, the development of my ideas and my final outcomes towards the project. I am really curious to explore this project because it will allow me to create designs for an actual company and explore a target audience. The project will allow me to analyse the requirements and parameters of a 2D problem in art and design. Also the task will allow me to demonstrate the ability to plan, organise and prepare solutions to a 2D problem. It will allow me to apply practical skills, understanding and methods to also solve problems through 2D design. Finally, the project will allow me to analyse the effectiveness of solutions to 2D problems. To start the project I decided to create a mind map to plan out how I am going to achieve each element. For the layout I decided to create a spider diagram because it allowed me to explore my thoughts and ideas and develop them further. For the layout I decided to create a visual mind map to show my planning through art and also present my research onto the page. To start the layout I placed all the criteria I need to complete and placed them onto the page. Next I worked into the different sections and highlighted what I am going to complete. All the elements written onto the mind map will be completed and planned throughout the project. The task allowed me to demonstrate the ability to plan and organise what I am going to design and research in the project. Also the task allowed me to understand the live brief thoroughly and highlight key words that will be used in the project. Finally, the task allowed me to identify the target audience and important information about them.

Tuesday 1 December 2015

Transcribing Caro Evaluation Part A


The “Transcribing Caro Project” was my first experience exploring a 3D project and a variety of elements joined together to complete the whole task. Firstly, I found collecting primary research from our gallery visit to the Yorkshire Sculpture Park and Hepworth gallery valuable because it allowed me to explore a range of media and use my art skills to create folding sketchbooks. The folding sketchbooks allowed me to observe a range of Caro’s sculptures and create my own styled drawings based around them from a range of dry materials. I believe this was valuable for me in the project because it allowed me to interpret my own view of Caro’s pieces and create a range of sketches that were taken from a variety of Caro’s pieces from paper sculptures to outdoor sculptures. I also found it valuable collecting primary research from the gallery visits because it allowed you to compare Caro’s work in both galleries with the folding sketchbooks and images. The trip was valuable because it allowed me to collect a variety of primary images that were placed into my sketchbook for further development and were used throughout the project. Also the trip was valuable for my primary research because it allowed me to collect images at different angles and perspectives that was useful for sketchbook work to create themes and textures. I found looking at the sculptures in real life better than secondary images because you can explore the piece at different angles and perspectives. Also it’s better to look at sculptures in real life because you can look closely into how the elements were placed together and this was shown in Caro’s work with strong fixtures and fittings. Finally it’s better to look at sculptures in real life than secondary images because you can see how it fits in the environment and how other people in the gallery interact with the pieces. This is demonstrated in the “Childs Tower Room because children were climbing onto the piece and exploring it which shows the interaction that cannot be seen through secondary images.


Childs Tower Room


I think that my primary research turned out well because I collected a variety of information, photographs and two complete folding sketchbooks from both galleries. I believe the photographs turned out well in my primary research because I collected a variety of images that explore Caro’s work and the use of different materials, how the sculptures were placed and the scale of sculptures. I captured the abstract sculptures at different angles and perspectives and this turned out well for me because it allowed me to use them for my sketchbook work and develop them to create my final stages of design. Also I think that the two complete primary research folding sketchbooks turned out well because they showed my observations of Caro’s work from my view with a variety of different materials being used and drawing techniques. The information I collected from primary research was useful as it allowed me to go into detail and depth about the “Childs Tower Room”. It allowed me to collect information about the sculpture and Caro’s thoughts behind the sculpture. However to improve my primary research information I would collect more information from different sculptures as I only focused on one sculpture and I could have collected more information which would have been taken into my sketchbook work for annotation.

The secondary research I collected was effective because I explored a variety of artists which were Peter Dahmen, Alexander Calder and Frank Stella. For the secondary research I collected a variety of images from each artist and created sketchbook pages that had layouts relating to the artist and materials. Also I collected secondary information which was effective because it related to the art movements they were involved in, what materials they use, personal life and specific details behind some pieces of work. All the secondary research artists I collected was effective because they all related to Caro’s work and the artists chosen were compared to him in my sketchbook work. All the artists I collected had similarities to Caro and this was effective for my secondary research because it allowed me to explore further into abstract art but always relating back to the “Transcribing Caro Project” and brief.

Throughout the development stages for my 3D sculpture task I have developed, organised and planned what I was going to create. Whilst in the designing stage I decided to create a plinth mounted 3D piece because I thought that was the most effective layout to create because you can build up a design and make it look like a strong architectural piece. I was wanting to create a strong architectural piece to relate back to my secondary renaissance research because my task was based around Caro where he took inspiration from architecture renaissance paintings and created sculptures from them. I was following in the footsteps of Caro and I decided to create a range of plinth mounted 3D pieces that expressed strong architecture. For my design stage I organised my sketchbook and split the pages into sections to organise and plan my 3 different designs. All the designs considered materials from each workshop and related back to Caro’s work and renaissance paintings. When I started to develop me final design, I prepared solutions in 3D by asking workshop leaders for advice and changing the design for it to be suitable for the workshops. I also organised the materials I was going to using whilst developing the design further.


I have used practical skills in the 3D workshop that I have learnt from the workshop introduction to create my final sculpture. In the workshop introduction I was taught how to use the machines in the room safely and how to use specific tools which were taken forward into my final sculpture. I have developed my methods and understanding of the machines I used in the 3D workshop to create my final sculpture and also to solve problems I faced. I have developed my knowledge and understanding that I learnt previously in ceramics and created 6 ceramic columns that were placed into the kiln safely. I have also expanded my knowledge in ceramics and started to use new materials that developed my understanding to create more effective clay pieces. In Print-making, I have used the knowledge I was taught previously in the workshop and developed it to create dry-point etching pieces that was printed by the same process for the final piece. Finally, the practical skills I used in photography and maquette making was paper sculpture which allowed me to create really effective abstract pieces that related back to the “Transcribing Caro” project.


In the workshop tasks I have faced difficulties with the print-making and 3D workshops. The first problem I faced was getting to place my print onto the design as I couldn’t place it where I originally wanted it to go because it wouldn’t print properly onto the surface. To overcome this problem I spoke to the print-making leader and decided to print the design onto paper and then place it onto the surface of my design. This has changed my original design but it overcame a problem I faced. When discussing to the 3D workshop leader about my final design I faced a problem which was that the ceramic bases wouldn’t hold together because of the weight they carry. This would make the pieces break if they were placed together. To solve the problem, the 3D workshop leader suggested a platform which would attach all the pieces together and hold all the pieces together safely and not cause the pieces to break. I was pleased with this solution because it related to my renaissance research that featured steps in the architecture paintings. Also, another problem I faced was that the ceramic base was unstable to place ceramic columns onto it. To solve the problem, I created a piece of plywood that was going to be placed underneath the ceramic base to make the base stronger and even. These changes to my design changes the original design I created. However, I have overcome all the difficulties I struggled with and will continue to finish my final sculpture.  


I believe that I have managed my time more efficiently compared to the last project. I have given myself set targets to complete for weekends and in lesson. However I need to continue to improve my time management skills further as I fell behind in some lessons and workshops.
Add caption


26th November 3D Workshop

On Thursday 26th November we completed our final workshop task on the rota for the "Transcribing Caro” project. The 3D, woodwork workshop was an important session for me because I needed to create elements that will connect all the pieces I have already created together. Also the workshop was important because it was crucial to finish my design all together and give a good quality finish. The workshop also allowed me to decorate elements that would be placed into my design that would be ready to be placed together on the 16th December. The task allowed me to demonstrate my ability to plan, organise and prepare solutions whilst in the workshop. Also the woodwork task allowed me to solve problems in 3D and think of solutions that will fix the problem I faced. Finally the workshop allowed me to apply practical skills, understanding and methods to solve further 3D problems in the task.

To start the session we were given a recap about health and safety in the workshop. When we entered the workshop we were told to place our bags and coats away safely to avoid tripping hazards and causing serious injuries. We were also reminded about the safety logos on the machines which were "wear safety goggles" and "wear ear protection”. The rules and safety signs must be followed throughout the workshop to avoid serious injuries. After being reminded about the health and safety rules from the workshop induction, we followed them throughout the workshop task to avoid the risk of injury.
Firstly, to start the task I collected my maquette, ceramic pieces and sketchbook work to discuss to the workshop leader what I was wanting to create. I was pleased that my ceramic columns were complete as they helped me to collect measurements and see how all the pieces visually looked for me and the workshop leader. When discussing to the workshop leader about my design I faced a problem which was that the ceramic bases wouldn’t hold together and they would break if they were placed together like my design. To solve the problem, the workshop leader suggested a platform which would attach all the pieces together and hold all the pieces together safely. I was happy with the decision because it related to my renaissance research because some architecture in the paintings featured steps that were developed in my sketchbook. Also, another problem I faced was that the ceramic base was unstable to place the platform onto the design.  To solve the problem, a piece of Plywood was going to be placed underneath the ceramic base to make the base stronger and even. I decided to focus on the base and I measured the ceramic base which was 28cm by 29.5cm. To create the plywood base, I decided to measure the piece by 32cm and 33.5cm. After measuring the piece I took it to the band saw and used my previous knowledge to use the machine safely. After I created my base I drew around my first ceramic base and column. Then I collected a circle column that fitted the ceramic base and column and attached the piece to the wood with nails by using a drill. Once the two pieces were placed together securely, I collected the ceramic base and measured around the column. I collected the measurements and these were going to be taken further for the platform structure.

Ceramic Columns
Ceramic Base
The Plywood Base and wooden column
Attaching the two pieces together
Measurements for the plywood platform
Cutting the plywood platform
Plywood Platform and Ceramic column
Pillar Drill
To create the platform, I extended the size from the ceramic base measurement and created a long piece of plywood that was going to be divided into separate sections for the platform. This was also cut by the band saw and it was ready to be attached together. For the first base, I measured the ceramic base so that the piece of wood would be placed over the base to keep it secure. To get the circle, I placed the piece of wood at the pillar drill with a drill that created a circle. After the circle was cut through it was ready to be attached to the other pieces of wood to create the platform. To attach the pieces together I was going to use a drill to create the holes and attach the nails together. However, a problem I faced was that the drill would break the wood easily so I decided to use the pillar drill instead. To create the holes in the design I attached the pieces together and drilled holes into the surface then I placed nails to attach them together with a hand drill. I repeated the process to create the platform that was ready for the ceramic bases to be placed onto. Sadly, due to time management I didn’t finish creating my platform and the decoration around the design and on top of the columns. The next step is to finish my sculpture in the woodwork workshop in my independent study time to complete my sculpture ready for the due date.

The complete platform

23rd November Studio Practise


On Tuesday 23rd November we continued to work into our sketchbooks in studio practise. The studio practise allowed me to develop my design ideas and finish sketchbook pages that were incomplete.  Also, the task allowed me to demonstrate the ability to plan, organise and prepare to a 3D dimensional problem in the project. The task also allowed me to apply research activities to support solutions to a 3D problem in the “Transcribing Caro Project”. Finally, the design allowed me to complete the layouts and build up my annotation skills in my sketchbook pages.
Firstly, I decided to complete my design 2 sketchbook design as I didn’t complete the layout and the different stages I had when creating the final design. Previously, I created the layout of all of my design stages and started to build up design 2. I took inspiration from my research of renaissance paintings and combined both Caro’s work and the architecture to create my design ideas. To start the design I took inspiration from the strong columns presented in the paintings and started to build up a design made up of curved pieces joining together. Throughout the design stage I took into consideration all the workshop elements and all the materials that I could use whilst in working in the project. It is important to create a variety of designs because it shows you the variety of research you have collected and the development that has been taken at different stages in the project. Also it is important to create a variety of designs because it allows you to be creative and present all the different options you can create in the project. Finally it is important to create a variety of designs because you can combine different ideas together to create one final developed design. A problem I faced with developing the design was that I was unsure how to incorporate print-making onto the design. To solve the problem I placed the design onto a piece of MDF which print-making will be placed onto. Finally I finished the design 2 stage and decided to focus on annotation in my sketchbook. In my independent study, I collected a variety of information about the artists I have research and the art movements they were involved in. I also collected information about Anthony Caro’s artwork and more information about the artist. All the research I collected was from books, art galleries and official artist websites. I placed the information onto the pages and also expressed my personal response to the artists and work. Also to complete the sketchbook annotation I explained why I chose the layout of my designs and what materials I used. After completing some annotation on the secondary research pages, I continued to finish pieces that I needed to complete on different sketchbook pages.

Design 2 Sketchbook Page 

Annotated Sketchbook Page
Overall, the studio practise was useful as it allowed me to complete my design stages and annotation for my artist research pages. The next step is to complete annotation in my sketchbook pages and finish my design stages and final development stages in my sketchbook page.

Sunday 29 November 2015

19th November Print-Making and Photography.


On Thursday 19th of November, we continued to explore workshops to complete our 3D sculptures for the "Transcribing Caro Project". In the workshop we explored print-making in the morning and photography in the afternoon. I was really looking forward to completing print-making in the task as I enjoyed exploring the subject previously in the task. I was curious to explore photography in the workshop because I was unsure how we could incorporate the "Transcribing Caro" project into the task. However both of these subjects allowed us to apply our practical skills and methods with solving problems in 3D elements. Before we started the task, we were asked to collect images for print-making and have a design ready to be 
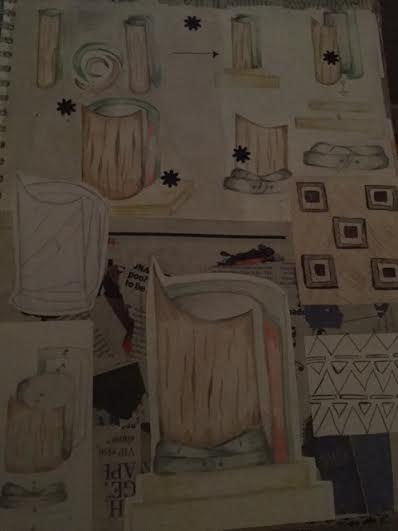
copied. For my design, I wanted to incorporate architecture because that's what Caro was inspired from when designing sculptures. Also, I wanted to incorporate my renaissance research as Caro took inspiration from Renaissance paintings and created 3D sculptures from the strong architecture shown in the paintings. I decided to combine both of these elements and created a layout that had a range of architecture buildings at the bottom and a Renaissance style pattern at the top. For the buildings I decided to simply them to emphasise the strong architecture they present. This was also inspired by an artist called Julie Mehetru who creates pieces that include strong architecture buildings.Also,I wanted to include a Caro style pattern at the top because I wanted to relate it back to the research I collected from my primary images. After coming up with an idea, we were given a brief introduction and a set of key words for the task. Dry-point etching is a process where you engrave into a surface with an etching needle to create a pattern. Also, we were reminded about key terms in print making that we used in the last project which was La Poupée and Chine Collé.Next we were given health and safety instructions that we followed throughout the task. When printing, loose clothing must be removed to avoid getting caught in printing-rollers. Also, hands must be kept away from the rollers to avoid getting caught in machines. These instructions were followed throughout the task.


To start the task I placed my etching plate on top of the design and started to engrave into the surface. As the piece was transparent, I copied the design straight from the drawing. I problem I faced with etching the design was that it was very difficult to engrave onto the surface as it kept moving from the design below. To solve the problem I collected a new etching plate and stuck the design onto the surface so that it wouldn’t move. After creating my etching plate I took it to the printing area. To place the ink effectively onto the surface, it had to be spread onto the etching plate with a piece of card. Once the ink covered the plate, we used newspaper print to remove excess ink and start to see the design more clearly. To finish the ink process we had to use paper to remove any excess ink left and create a smooth surface ready to print. For my first print I decided to use paper as I didn’t feel confident with using other materials. Next I placed the plate under the roller and then it revealed a finished layout that had an effective print. I repeated the process and used different colours and materials to create a variety of prints. I also created a La Poupée print that used a variety of colours which was made by placing different colours on different areas of the etching plate. Finally, I decided to create a print on a piece of MDF because that related back to my design layout where I am going to place my print on a piece of wood. The overall outcome was really effective as it presented the whole design clearly onto the surface. After experimenting with inks, we placed our designs on the drying rack and cleared all the work space away. The print-making task was really useful as it allowed me to plan and organise for my 3D sculpture by experimenting on different surfaces. In the afternoon we went into photography to complete the next workshop.
Design Layout at the top inspired by
secondary research.

Final Design Layout
At the start of workshop I was curious to explore photography because I was unsure how it was going to relate to the “Transcribing Caro” project. When I arrived at the workshop we were given a task which was to create an interesting, abstract paper sculpture that was going be taken into the studio. The piece we created had to be 3D like Anthony Caros work and incorporate an abstract layout in the design. Before we started to create our designs we were given instructions about health and safety which we followed throughout the task. As we were using craft knives, we had to be careful when using them as they can be very dangerous. We also had to use a cutting mat on the surface to avoid damaging surfaces. Also we had to use a metal ruler to avoid cutting yourself when cutting straight lines as craft knives can easily move out of 
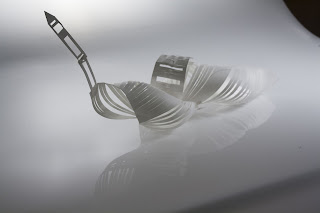
place. These instructions were followed throughout the workshop. For my design I decided to create a 3D hanging sculpture that was made up of really thin pieces of paper. I decided to create this layout because we were going to take them into photography so I thought it would create effective shadows and lighting. I took inspiration from feathers and created two paper shaped layouts that were joined together and hung up in the air by another piece of paper. After creating my design we took them into the photography studio.
First part of the 3D paper sculpture

Final 3D Paper Sculpture

Photography Studio where we placed our 3D sculptures
onto.
As a group we took a variety of different images from all of our sculptures at different angles and positions. To make the photographs look interesting we included a filter in which you take a photo of a colour and set it as a filter background to create different colours on the camera. This gave a really interesting effect as it showed different shades of colour, shadows and lighting. Also when taking photographs, I took a variety of images in a black and white setting which made the overall photographs look really effective and unique. I really enjoyed taking photographs of our sculptures because it allowed us to gain confidence with using the camera and develop the skills we already have from the previous workshop. I also enjoyed taking photographs because there was no rules and we could take a variety of photos in different colours and angles. Also to make the photographs and sculptures look interesting we changed the lighting in the room and where they were placed. For my 3D sculpture it was hung on a tripod which gave a really effective look as it gave shadows at different angles from above and below the sculpture. Some of the photographs I have taken are presented below.


Overall the photography workshop was useful because it allowed us to apply our practical skills and methods to solving problems through 3D sculptures. It also allowed us to create more abstract 3D sculptures and use them to collect different shadows from a variety of angles. It was important to explore this workshop because I was taught it related back to Caros work as the artist considered shades and lighting when placing his sculptures in galleries and also creating them. Both workshops were really enjoyable and it allowed me to explore and plan through 3D work.

Thursday 26 November 2015

17th November Studio Practise

On Tuesday 17th November we continued to complete sketchbook work in our studio practise. The studio practise allowed me to apply my research to support solutions and development of the 3D project “Transcribing Caro”. Also the task allowed me to demonstrate the ability to plan what I am going to create from my initial ideas and sketchbook work I have created previously.  The studio practise allowed me to use my research skills and discover more artists for my secondary research. Finally, the studio practise allowed me to continue creating my sketchbook pages and allow me to explore different layouts and materials.

Firstly, I wanted to complete some secondary research so I decided to collect some information about the artist called Frank Stella. I decided to collect some secondary artist research because it allowed me to be become more inspired by abstract artworks which I thought will be incorporated into my design process and development. In my independent research I collected background information about Frank Stella and the art movement he was in. I also collected information about individual pieces and what materials he uses. It’s important to complete secondary artist research as it allows you to be inspired by artists and learn about different materials and demonstrate your knowledge by replicating pieces that you have found. Also it’s important to collect secondary artist research because you can take inspiration from the pieces ad create our own designs inspired by them. Frank Stella is an abstract artist and painter who creates pieces that includes shapes and multi-colours. He creates 2D and 3D pieces that are very abstract and they are built up in a variety of shapes. Frank Stella relates to Anthony Caro because they both use abstract shapes in pieces and a variety of bright colours. Also, both artists relate to each other because they both create 3D abstract pieces that are very eye-catching and engaging. My favourite Frank Stella piece is “Juam” because it’s a very eye-catching piece that uses a variety of materials to create a collage effect. After collecting images, I started to create the backgrounds and designs for my Frank Stella Pages. For my first page, I decided to take inspiration from one of the pieces and collage the background with this particular design layout. A problem I faced was that the original painting was made from acrylic paint and I am not comfortable with using the material. However, I overcame the problem and used my own watercolour paints that gave the same appearance and it looked really effective. After creating a background for the piece I focused with the “Juam” Frank Stella inspired page. I wanted to create my own piece inspired by “Juam” because I found the piece engaging and I felt I could create my own piece that incorporated the “Transcribing Caro Project”. To start the page I placed different surfaces onto the paper and built it up to create a 3D texture like the Frank Stella Painting. Then I placed some ink sketches that were on the original “Juan” piece which related back to the original layout. Also, in the studio practise I continued to finish extra details that were missed on my previous sketchbook pages which made them complete and ready to be annotated. A page I completed was my final design layout which I started in my independent study. By completing this page it allowed me to demonstrate the ability to plan, organise and prepare solutions.
The next step in the “Transcribing Caro” project is to continue to complete my sketchbook annotations and development for my final piece.

Ceramics Workshop

On Thursday I started to create my 3D sculpture in the "transcribing Caro" project through ceramics. I was really looking forward to start the 3D sculpture as I think ceramics is the most important element in my design work as it holds and connects all the design together. I was also looking forward to start the project because ceramics is the key elements of the design and once I have created them it will help me when exploring other workshops for the sculpture. The task allowed me to solve problems in 3D and apply practical skills to create the final product. Also, the project allowed me to apply my knowledge that I have learnt in the previous ceramics task and use the methods within the workshop to create my final piece.

To start the workshop, I collected my sketchbook design ideas and maquette and discussed what I was going up create with the workshop leader. When talking to the ceramics leader I figured out the measurements I required and how I was going to make them look equal. A problem I faced when creating the design layout was placing the design so it wouldn't collapse and damage my design. To solve the problem I explored my maquette at different angles and figured out that by placing the Columns at a diagonal angle they can be place so that the structure will be safe to use. After coming up with the idea, I started to focus my design with the ceramic base. To create the base I collected eathernware and started to work into the clay to allow all the air to escape from the material so that it won't cause damage when being placed into the kiln. I felt confident with using the technique as I gained confidence in the previous workshop when creating ceramic hands. When the clay was ready to use I rolled it out evenly with the technique I used previously in the workshop. Eventually I got a even layout of clay ready to use. I problem I faced was that I was unsure with the measurements for my ceramic base from the maquette. To solve the problem I collected my maquette and decided to have a 2:1 ratio which meant my final design would be double in size from my original maquette design. After collecting the measurements I created the base which was ready and placed into the drying room. Next I focused on creating my first column that was going to be on the base. I decided to have the first Column also to be made from eathernware as it would match the ceramic base material and also look like the whole piece is connected together. I repeated the same process as the base and it was ready to be rolled out for the Column. To make the rounded column shape that I wanted I collected a plastic tube and placed newspaper around it. Newspaper was used because the clay wouldn't stick to the tube which allowed it to stand freely and ready to be placed into the kiln at the size I wanted. For the measurements I continued to use 2:1 ratio from my maquette and I measured the size I wanted to create on the newspaper. To wrap it around the tube I placed the tube onto the clay and collected the surface that the clay was on and started to roll it which allowed me to cover the whole tube. Once the tube was covered in clay I placed the object at an angle and removed excess clay that wasn't needed to reach the measurement I placed on the newspaper. To join both ends of the clay together securely I used earthenware glue and made little marks into the clay to allow both pieces to join together. Once I joined the pieces together I faced a problem as the joint piece had a rough surface which wasn't on my design. To solve the problem I collected a ceramics tool called a kidney bean and smoothed off all the edges that were rough. On my design all the columns are made from different materials so I focused next on the stoneware column. I repeated the process that I did for the earthenware material and I felt more confident using stoneware because I have used the material before in the previous workshop. I noticed when using the different materials that they had different textures and this made them unique to work with. I found stoneware most effect to use because I've had previous experience with the material. I repeated the process for creating the Columns but used stoneware glue instead to match the material and give a good quality surface. I found working with porcelain the most difficult material to work with. The problem I faced using the material was that I the substance was really soft compared to the other materials so it made it difficult for me to shape and roll into to create the surface I wanted. However, I overcame the problem and produced two produced porcelain columns that had a smooth surface and correct measurements that were ready to roll. I created two columns for each material I used which came to a total of 6 columns. After I created them I moved onto decorating them. To match the brief “Transcribing Caro” I placed strong abstract patterns and shapes onto the columns. I also wanted to incorporate the research I collected from my renaissance paintings so I took inspiration and combined both ideas to create patterns. Sadly, because of time management, I was unable to decorate the porcelain columns. To improve next time I will plan my time when completing tasks in the ceramics room.

The Final Outcomes

The Modelling Process
Stone Ware Close up final outcome
 Overall the workshop was useful because it gave me the confidence to start the 3D sculpture in the “Transcribing Caro” project efficiently. Also the task allowed me to apply practical skills and methods to start and create my 3D sculpture. Finally, the workshop allowed me to solve problems through 3D techniques.