Friday 27 May 2016

24th May Creating My Final Tree Layout And Surface Of My Squirrel Character


On Tuesday 24th of May I continued to create my final project piece for “Unit 8” Structures” through creating a final tree layout and starting to build up characters within my piece. Building up the characters involved creating features and textures within the layout of the animals that were going to be placed onto my piece. In the studio practise, I decided to focus on my “squirrel” character as it is placed within the foreground of my piece and involved a variety of elements and textures within the design. The design layout included the texture of fur and different colours within the body which all combined together to create my final character outcome. To recreate these elements I explored different paper cutting techniques and materials to achieve this. The task allowed me to continue to develop my confidence with paper cutting skills and layouts by creating a final feature element for my background piece. Also, the task allowed me to adapt my paper skills through re-creating more intricate details and textures within the characters of my piece. By completing the task, it has allowed me to experiment in further detail about paper cutting and combine my knowledge and ideas to create new character layouts. The task allowed me to explore within a new element of paper cutting through working into a large amount of surfaces and textures which gave a unique outcome. Overall, the task was useful because it allowed me to demonstrate the ability to plan, organise and develop my final project for “Unit 8 Structures”. Finally, the task allowed me to apply practical skills and theoretical knowledge and understanding to complete my final project.

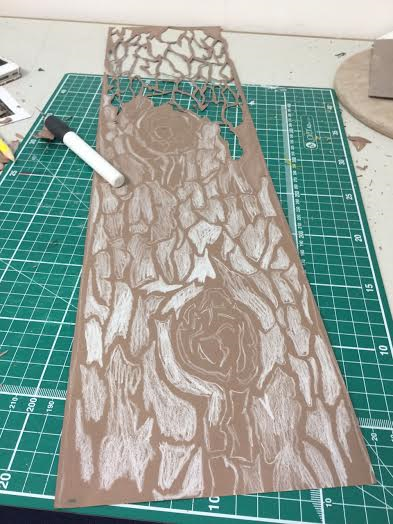
To start the task, I decided to complete my final tree layout for my last section within the suspended shelf for my project. For the measurements I continued to make the height accurate for my paper cut scene and used 60cm for the piece. The length of the piece was 5cm because I continued to create an effective background which includes the scene moving into the distance. After creating the measurements, I decided to design the surface of my design which was tree surfaces. I felt confident when creating the layout of my design as I have developed my skills throughout the project and produced several tree pieces for the background of my piece. However, I continued to be less confident with cutting the piece out as it was an intricate design which is easily breakable when working to the layout. When working into design, I did face minor problems with the layout as I broke some parts of the pattern design with my craft knife. I overcame the problem and I will continue to develop my skills throughout the project but also gain confidence from this. After completing the background piece, I focused creating my “squirrel” character which is featured on the foreground of my piece.

To create the elements and features for my “squirrel “character, I decided to collect my secondary research images of the animal and observe the colours and textures of the layout. I found collecting these images useful as it allowed me to identify what features and elements I needed to include. For the texture, I noticed that a variety of colours and different shades were built up together in the fur and within the tail. To recreate this, I collected a large amount of colour card strips and started to build up the body and tail which became successful as I believe the collage matched the original image. Also, within the images I noticed that striking shades were on the layout of the animal. To re-create this I cut out pieces of large card and built them up together to create surface I was wanting to achieve. Finally, for the texture I decided to work and scratch into the surface in order to achieve the surface of fur. Throughout this task, I was nervous to explore the character as I haven’t worked into layouts that were really small and intricate. However, I developed my confidence which will be taken further into my project as I will be creating further intricate paper characters. Overall, I enjoyed creating the character as it allowed me to include features and characteristics within my design which will make my final piece more engaging for the audience.
 

Next, I am going to continue to create further characters of my final piece which will include a “stag” with a variety of textures and surfaces.

Creating My Shelf


To create my shelf for my final project piece, I decided to measure out my final idea which has been developed from my original maquette structure. For the length I decided to keep it as 60cm because I believe its suitable size for my final piece and I can include a variety of intricate details throughout the piece. Also, I have decided to keep the same height because I think that the size is large enough for the piece to work effectively but also create intricate details for each individual layer. For the sections of my shelf I decided to change my original 3 different layers which included a background to 5 layers with a background. I decided to change my original maquette layout because I believe that it wasn’t effective and I felt that it didn’t achieve the effect I was wanting to create with the build-up of my work. Also, I decided to change my layout because I wanted to include more elements within the design such as trees to make my final piece more effective. Finally, I decided to include more layers because I wanted to emphasise each individual elements I will create for my final piece and present the suspended layout technique. For the distance between the layers, I decided to keep it the same measurement as I believe it creates the suspension effect I am wanting to achieve and identifies each element within the piece. The distance between each section is 15cm and this is repeated through the layers.

Once the shelf was created, I decided to sand the piece down as the material had an uneven surface. Throughout the task I followed health and safety instructions in order to avoid the risk of injury. I used sand paper to smooth the surface down because there was a risk of injury when handling the piece. After sanding the piece down, I decided to paint the shelf the colour white as it would match my studio space and exhibition. This colour was chosen to camouflage the piece into the background and also to emphasise my final piece. Also, this colour was chosen because I wanted to create the suspension effect and emphasise the overall layout of my final piece. Once the piece was painted, It was ready to be placed in my exhibition space to suspend my work.


19th May Creating The Second Layer Of My Piece And Character


On Thursday 19th of May I continued to complete my final piece for "Unit 8 Structures" which is a large, woodland paper cut scene. I continued to work into my scene through completing the next layer of my piece by creating tree trunks and editing the sizes. Also, I continued to work through my scene by completing the second layer element of my design that includes a layout of a squirrel. By completing this task, it has allowed me to develop my paper cutting skills and adapt them to create a large scale piece. Also, the task has allowed me to develop my knowledge with using my final material and also allow me to gain confidence throughout the task to create my final outcome. By completing the task it has allowed me to demonstrate my knowledge and thought process whilst completing this project and representing it though my final piece. Also, the task has allowed me to explore a new element within my task which is creating animals through paper cutting and presenting the features within this technique. Overall, the task has allowed me to demonstrate the ability to plan, organise and develop my final piece for "Unit 8 Structures". Finally, the task allowed me to continue to apply practical skills and theoretical understanding for my final project piece.

To start the task, I continued to create to complete my second layout of my final piece through cutting out the surface pattern of my tree trunk design. I found creating this layout easier than my previous foreground tree pattern because I have gained confidence with developing the surface and adapted my paper craft skills in order to fit my final piece. Throughout the task, I have followed health and safety instructions to avoid the risk of injury whilst creating my final piece. I continued to use a cutting mat to avoid the craft knife damaging the surface. Also, I continued to place my hand away from the cutting knife to avoid the risk of injury when cutting pieces out for my final piece. All these instructions were followed throughout the task. Once I completed my tree trunk surface, I focused on creating the next layer of my work which involved further paper cuts of trees. A problem I faced when completing my design was that I didn’t have enough resources and materials to complete my squirrel surface layout. I will complete my squirrel character further along into my project.

To create the next layout of my design, I measured out the elements for the pieces I was going to create. As I continued to create the next layer, I wanted the scene to move into the distance which would reach my background so I made the measurements of my elements smaller. For the height I continued to create the pieces at 60cm as it would be at equal length. However, for the length I measured the pieces at 10cms. After measuring the length I worked into the surface and created the texture on the tree surfaces. I continued to be inspired by my previous research and I developed my ideas to create individual tree surfaces. After creating the layout, I started to cut into the surfaces and develop the texture I was wanting to create. A problem I faced when cutting out the surface of my design was that the pieces were very intricate which made it difficult for me to cut out. By the pieces being intricate, some of the surface was damaged through the equipment I used. However, I gained confidence with creating the layout and I completed the next layer of my final design. The layer is presented below.

Next, I am going to create the next layer of my final scene piece and start to create characters for my project which will include the squirrel and woodpecker design.

17th May Creating The Foreground Section For My Final Piece


On Tuesday 17th of May, I continued to complete my final project piece for “Unit 8 Structures”. In the studio practise I decided to create my foreground element for my “structure of nature” scene as I believe that it will help me to build up the piece up more accurately with measurements and placing the design within my shelf structure. Also, I decided to create my foreground piece as it will allow me to work large scale and create more intricate details which will take more time but also be completed in the studio practise day. Finally, I decided to create my foreground piece as I believe that I gained confidence previously from my large background piece to create my detailed foreground piece. The task allowed me to develop and adapt my skills I have used previously when creating my final piece to create another element for my final design. Also, the task allowed me to transcribe my final idea from Marquette, sheet work and sketchbook work to create my piece. By continuing to complete my project piece, it has allowed me to demonstrate the ability to plan, organise and develop my ideas for my final outcome. Finally, by continuing to complete my final piece it has allowed me to apply practical skills and theoretical knowledge and understanding to my final project.
To start the task, I decided to complete my last specific details for my background piece as it would be ready to be placed onto the shelf within its accurate measurements. The specific details on the background included patterns within the path and tree trunks. I found completing this task challenging as I have been cutting into large pieces within the piece and haven’t focused on small intricate details. However, I overcame this problem and gained the confidence to create these small elements and complete my final background piece. The outcome of the design is very intricate and delicate to hold so I will take this knowledge further into my project when I am placing all of my elements together carefully. After completing the piece, I focused on creating my foreground piece which is a tree trunk and woodpecker. When measuring the piece out, I decided to create my wood pecker separately which is different to my marquette because I wanted to make the bird more accurate and present my paper craft skills further. I wanted to present my paper craft skills further through etching onto the surface of the bird and placing all the colours that represent the woodpecker. To create my tree trunk, I measured my piece 15cmx60cm because my overall background height measured at 60cm. I decided to create my length at 15cm because I believe that it is a large piece to create my surface but also continue to show elements of my background. After safely cutting the measurements out, I started to create my design surface pattern. A problem I faced when creating the pattern was that pencil didn’t show up on the surface colour “mocha”. To solve the problem I used a white pencil to draw out my design onto the surface which made the lines easier to identify when cutting the layout out. When drawing my layout, I was inspired by tree surfaces from my primary and secondary research and development I have collected throughout my project. I found creating the layout challenging as I had to consider the proportion and scale for my work as it was a foreground piece of my design layout. However, I overcame this problem and created an accurate layout for my final piece. When cutting the layout of my piece I followed health and safety instructions throughout the task. I used a cutting mat and metal ruler to avoid damaging surfaces and avoiding the risk of injury to my hand. Also, when cutting out my design with a craft knife, I placed my hand away from the blade to avoid the risk of injuries. These instructions were maintained throughout the task. A problem I faced when cutting out my design was that the piece included intricate pieces that were damaged easily with my craft knife. However, I overcame the problem and used glue to repair my broken pieces and combine them together to create my original design layout. The final outcome is presented below.


Next I am going to complete another tree trunk element for my final piece that will be placed on the second layout of my shelf scene. Also, I will be creating woodland animals that are included within my design.

.Exploring The Technique "Suspension" In Further Detail


I decided to explore and experiment in further detail the "suspension" technique through completing another 3D paper cut scene. I continued to use images from my primary research to achieve this technique and I also decided to make the piece small scale to see if it would work effectively. Previously, I worked with A3 size to complete my paper cut 3D suspension piece. The outcome was very effective and created a 3D scene that looked different through a variety of perspectives. I have decided to work to the size A4 to experiment if the size of paper is more effective at different scales and also to develop my knowledge of using this suspension technique further. I continued to use this technique as I found the piece more effective and presents the intricate paper cutting details from a variety of angles and perspectives. Also, I continued to use this technique as I have explored a variety of methods to present my work previously and I believe this element is the most effective as the layout presents all the paper cuttings and scenes more effectively which combine together to create a detailed outcome. This technique was developed further compared to the other designs because they didn't present the paper cutting pieces effectively as they were damaged easily and displayed through a table. The advantage of creating a shelf is that my paper cutting pieces are safely displayed and suspended so that they will not be damaged when they are put on display. However a problem I faced when placing work on display through this technique is that I found it difficult to attach the pieces together and I believe the material I used wasn't effective as it can be seen when displayed. I will continue to develop and experiment with materials to find out which is the most effective to be displayed and attach the pieces safely together. By continuing to experiment with this technique, it has allowed me to demonstrate the ability to plan, organise and develop how I am going to present my work for my final project.


To create my paper-cutting piece, I printed an image from my visit to the Lake District which was a wetland environment scene. I decided to use this image as I could identify a variety of layers which I thought it could be developed and created into a 3D scene. Also I decided to use this image as I believe I will be inspired by the research to create my own initial designs for my final piece. Next, I photocopied the image twice to create 3 layers and transferred them onto card. Previously I found placing the images onto card not effective as it caused the layout to break easily when the design is being cut out. This has been demonstrated again through this experimentation which caused the layout to be less effective overall. To improve next time, I will continue to develop my ideas further and explore an alternative paper-cutting technique which will create an effective outcome within the suspension technique. After cutting the layout out, I placed the elements together and measured out where I needed to create spaces to place my material to suspend. I continued to use string for my suspension technique as it a strong material which can hold the weight of paper safely. However, a problem I faced with the string was that it could be seen when the outcome was placed on the shelf which made it less effective to the piece. To improve next time, I will continue to explore materials in further detail and find a suitable transparent material to hold my work safely.

Overall, I was pleased with my outcome as it created a 3D paper-cut scene and continued to look different from a variety of angles and perspectives. However, I believe that working with a bigger paper scale is more effective as it presents the intricate pieces within my work in more detail compared to the A4 size. I will develop the information and research I have collected from this experiment further into my project.
Video Link- https://www.youtube.com/watch?v=KSC31ibNy4U&feature=youtu.be
All the images are presented below.


12th May Creating My Background Piece


On Thursday 12th of May I continued to create my background layout for my “Unit 8 Structures” final project piece. The task involved creating my background layout which included cutting out my tree designs and starting to work into my path layout for the piece. I was nervous to create my path background piece as it is an important element within the design as it starts from the background and travels towards the foreground which will hold my “stag” character in place. The layout has been developed from my design sheet and the Marquette I have previously created. However, I am working towards a larger scale and this has been measured out accurately in the previous studio practise. I continued to develop my paper-cutting skills within the task, to create a large scale piece and also achieve intricate details within the design. By completing the studio practise, it has allowed me to continue towards completing my final project piece for “Unit 8 Structures”. Also, by completing the task, it has allowed me to develop my understanding and skills I have learnt and adapted from this project to create my final project piece. The task has allowed me to demonstrate my understanding and knowledge I have learnt throughout the project to complete my final project piece which demonstrates the progress I have achieved. By completing the task, it has allowed me to continue to develop my paper-cutting skills and techniques in order to achieve an accurate background piece. The studio practise has allowed me to demonstrate the ability to plan, organise and develop my final project piece. Finally, the task has allowed me to apply practical skills and theoretical knowledge and understanding to complete my project piece for “Unit 8 Structures”.

To start the task, I collected a large cutting-mat which was the surface for my paper-cutting process. Health and safety instructions were followed throughout the task in order to avoid the risk of injury to hands. I continued to place my hand away from the cutting knife and I used the cutting-mat to allow the knife to be safely through my design. All the health and safety instructions were followed throughout the task. To continue with the design, I decided to complete the tree outlines that weren’t completed in the previous task. I believe that I have gained confidence with cutting the trees out as I have developed my paper-cutting skills and created a technique which allowed me to achieve the intricate details within the piece. However, I did face some minor paper-cut damages to my design but it didn’t affect the overall appearance of the layout. After completing the trees, I focused creating the path background of my design. I was nervous to start the task as it was the most important element of the piece as it will be placed within the centre and work towards the foreground from the background. I was also nervous to complete the task as it included intricate details within the path layout which can be easily damaged when worked into the piece. However, I continued to work into the piece and started to create the background piece of my design. I started to paper-cut the intricate details first within the design path as I believe they were the most difficult pieces to achieve and the most likely to be damaged. I developed my confidence when completing the intricate details and I started to work into the outline of my path piece.
 

Due to a visit to a local art gallery, I was unable to complete my final background layout piece. Next, time I will complete the final elements and details of the background piece and start to create my foreground pieces.

10th May Creating My Background Layer For My Final Piece


On Tuesday 10th of May, I started to create my final project piece for “Unit 8 Structures”. The studio practise involved creating my first background layer which incorporated the design layout of trees and a path. I was nervous to create this piece as I haven’t worked on a large scale to recreate my piece as the original Marquette design was created through the A4 size. However, I was prepared for the task as I have practised previously and created a final layout which involved measurements and my shelf. Also, I was prepared to create the final piece, as I have used the material previously within my design sheet to create the layout I was wanting to achieve. I was curious to start the task as I was wanting to see if my design layout will look effective in large scale as my previous exploration of the “suspension technique” concluded that working towards a bigger scale creates a more effective 3D paper-cut scene. By completing the studio-practise, it has allowed me to develop my skills and understanding I have learnt from this project to create my final project piece. Also, by completing this task, it has allowed me to demonstrate my project progress through research and development to create my final piece. I have adapted my paper-cutting skills and techniques to work towards a large scale piece for my final project “Unit 8 Structures”. By completing this task, it has allowed me to demonstrate the ability to plan, organise and develop my final project piece. Finally, by completing this task, it has allowed me to apply practical skills and theoretical knowledge and understanding to complete my project piece for “Unit 8 Structures”.


To start the task, I collected my material “Forest Green” card and measured out the background I am wanting to achieve. To relate my design measurements to the layout of my shelf, I continued to keep the length at 60cm and the height at 60cm. This would allow my piece to fit into the shelf measurements accurately and also look effective when placed on display. Also, I decided to use these measurements as I believe that I will be able to work at this large scale piece in order to complete my design. To make my measurements accurate, I decided to use a paper-cutter in order to achieve a straight line and effective measurements to place my design layout onto the material. After creating the background, I started to create my design layout trees. I was nervous to start the task as I was worried that I would make a mistake which would affect the overall design. However, I overcame this problem and I started to create the layout. A problem I faced with the material was that when I was drawing with a pencil it wouldn’t be presented effectively within the surface. To solve the problem, I collected a white pencil and continued to work into the design layout which gave an effective outcome within the sheet. I was really happy with the outcome of my trees as they were the right size I was wanting to achieve but also effective as I placed the correct number I was wanting to draw within my layout. Next I focused creating the path which I believe was difficult to achieve. The path within the layout moved from the background towards the foreground. I found creating the layout difficult to achieve as the layouts were inaccurate when I started to draw the basic layout. However, I overcame the problem and after a couple of attempts I created the path layout I was wanting to achieve. After, drawing the elements and details within the path, I was ready to paper-cut my design. For my paper-cutting I continued to follow health and safety instructions throughout the task to avoid the risk of injury. I collected a large cutting-mat as I was working at a large scale and avoided the risk of injury when working into the layout.  When working into the design, I placed my hand away from the craft knife to avoid the risk of injury when cutting the pieces out. All these instructions were followed throughout the task. When cutting my design out, I found it difficult at the start of the task as the increate pieces were hard to achieve accurately which caused some damages to my original design layout. However, as I continued with the task I started develop my confidence and I used my paper-cutting skills to cut the background trees out accurately.


Due to time-management, I was unable to cut my final background layout out which included a couple of trees and the path design. Next, I am going to achieve my background layout which will be ready to be placed onto the shelf.

Maquette Of Final Piece


To create a maquette of my final piece, I decided to create a smaller scale piece which incorporated all of my elements and characters which will be taken into my final work. I decided to create a small scale piece because I wanted to experiment if the elements worked successfully together and what pieces I need to change or include towards my final piece. By working smaller scale, it has allowed me to focus with the basic outlines of my pieces and to analyse which place is the most effective to “suspend” them onto my shelf. Also, by working smaller scale it will allow me to analyse how the pieces of my work are suspended and also analyse the appearance when they are placed. Finally, I decided to work smaller scale as if the piece has any mistakes or I damage any elements within my design I will be able to correct them which will be taken forward into my final large, project piece. By completing this task it has allowed to create all the pieces of my final project piece and reflect how effective they are and to see if they recreate the 3D paper cutting scene I am wanting to achieve. Also by completing this task, it has allowed me to identify if the chosen material is effective and how my work is suspended. Finally, by completing the task it has allowed me to develop my confidence with creating the final pieces which will be taken into my final project and enlarged to a bigger scale. Overall, by completing a maquette of my final project piece, demonstrate the ability to plan, organise and develop my final solutions and ideas for my piece. Also, by completing the maquette it has allowed me to apply practical skills and theoretical knowledge to create this piece and to develop my understanding for my final project piece.

To start the task, I collected a variety of A4 coloured card which I have used previously in the project. For each layer, I decided to change the colour of the card to identify where the elements are going to be placed onto my final piece. However a problem I faced with the layers was that I was using my original shelf which only had 2 sections and a background compared to the final shelf I am creating which has 4 sections and a background. To improve my piece, I will identify within my sketchbook which elements are going on my final sections of my shelf. This will then be developed and created for my final project piece. To create the Marquette I decided to create the background layer of my piece first as it is the outline of my overall piece. For the background, I drew the outline onto the surface which I found challenging as I was working on a small scale piece of paper. However I overcame this problem and started to cut the design out. When cutting the path of my design out I noticed that I included a variety of intricate details which made the outline very fragile and difficult to place onto my design. To improve next time I will include less intricate details and patterns which will make my piece stronger and easier to place for my final project. Also, another element I identified within my maquette which will be taken into my final piece is the bottom section of my path needs to be just completed before the edge of the material to allow all of the pieces to be connected and combined safely together. After completing my background, I placed the layout onto my shelf with tape. I found that tape wasn’t effective because it could be seen within the layout and has a risk of damaging the piece. I will continue to develop ideas and solutions to place my final background piece. To create my foreground piece I used a different piece of coloured card an started to work into the surface of my tree and woodpecker design. When creating the tree surface, I believe I have gained confidence and inspiration from my primary research images to make them which allowed me to create my own designs for my final piece. I attached my woodpecker design onto the tree surface and outlined the patterns I am going to create. However, for my final piece I am going to create my woodpecker design separate and place the outline next to my tree design. I have decided to change this decision as the surface and colour of the woodpecker are different to the tree colours which will include a risk of the colours showing which will make it less effective. Once I created the foreground piece I completed the next layout which involved a tree and squirrel. For my final piece, I have decided to keep both of these elements attached together as they both have similar colours which will be suitable to be combined. I found creating the squirrel outline easy to create as the piece had simple outlines and features. Next I focused creating my stag piece which will be placed in the middle of my piece. I decided to just draw the outline of the stag as it will be placed further away within the design layout. I will be including patterns and surfaces of the stag when I create my final design. Finally for my maquette piece, I created a tree branch which was placed at the top of my paper-scene. I will not be placing the design layout onto my final piece because I believe it doesn’t look effective when placed with the other elements of my layout. Also, I have decided not to place this design layout as I believe it will not work successfully large scale. Al of the pieces I created were attached with black string to the surface of my shelf. This material is not effective as it can be seen which makes the pieces less effective for the 3D scene. Also the material allowed the pieces to move which made the outcome less effective. For my final piece I will be using a transparent material which will attach the pieces together to my shelf. Also, to stop the pieces moving I will be attaching material towards the bottom of my piece to allow them to be stable and fixed in a strong position to create my paper-cut scene.

Overall, I was happy with my maquette piece as it allowed me to gain confidence with creating the final elements and also make changes towards my final piece. Next I am going to complete my final piece. All of the images are presented below.
 Video Link-https://youtu.be/82aIZHRseYQ


5th and 3rd Of May


On Tuesday 3rd of May and Thursday 5th Of May, I started to create initial ideas for my final project piece “Unit 8 Structures”. The studio practise consisted of creating 16 initial design ideas that have been inspired through all of my research sources and developments. I was nervous to start the initial designs as I was unsure what I was wanting to create and how I was going to achieve it through my final project piece. However, by developing my confidence throughout the studio practises, it has allowed me to generate a variety of ideas which will be taken further into the development stages of my project. By completing this task, it has allowed to combine my research sources together to create my own paper-cut designs for my final project. Also, by completing this task it has allowed me to combine both of my elements of the project to create initial design ideas for my final piece. The task has allowed me to develop my confidence within the project and develop my own ideas and solutions to create initial design ideas. Also, by completing the task it has allowed me to generate a variety of ideas through creating 16 sketches and outlines of designs. Finally, by completing this task it has allowed me to demonstrate the ability to plan, organise and develop ideas for my final project.

To start the task, I decided to create the background layers of my design. As I was going to be creating 16 initial designs, I decided to make the 4 pages look similar so I collected patterned card and watercolours. To relate my background to the theme “Structure Of Nature” I decided to create a green watercolour background as the colour relates to the environment. Also, I decided to place patterned card onto the design as it related back to my other theme “paper structures” which allowed me to combine both elements together onto one sheet. By making all the initial design pages look similar, it will allow me to identify within the sketchbook my design process and the starting point. After creating the background I started to create initial ideas for my final piece. All the designs I created were sketches which highlighted individual pieces within each element of the each designs. I decided to include animal and insect figures within the designs as I was inspired by the works of Mark Hearld and Helen Musselwhite and I wanted to present my influences throughout my project. Also within my work, I was inspired by the architectural structures within nature that I have collected from my visit to the Yorkshire Sculpture Park and Wentworth Garden Centre. A variety of elements taken from my research have been placed into my initial design ideas and this has inspired me to expand my ideas further into the development stages.

Next I will complete development page which will present 8 designs that have been chosen from the initial ideas to be expanded further. These designs will include the further development of colour, scale and what materials I am going be to using.


28h April Exploring How To Present My Paper-Cutting Work


On Thursday 28th of April, I continued to explore how I can present paper-cutting pieces through a technique called "suspension". This involved creating a wooden shelf with a number of layers that would allow a variety of paper cutting scenes to be placed together to create a 3D paper cut outcome. Whilst exploring how to present paper cutting pieces, I continued to explore initial ideas and designs that included photographs of my primary research that relate to my theme "structure of nature". Also, I continued to develop my ideas for my final piece by working into primary research but also generating ideas to place my paper cutting work effectively. The task allowed me to combine both elements of structure that I have explored throughout my project and to develop ideas for my final piece "Unit 8 Structures". Also, the task allowed me to gain inspiration from my primary research to develop my own ideas for my final piece and how to create an effective paper-cutting scene. By completing the task, it has allowed me to experiment in further detail how to present my final project piece and analyse which is the most effective outcome to develop further. Also, by completing this task, it has allowed me to gain inspiration from my primary research images to develop my own final ideas which will demonstrate my development throughout the project. The task has allowed me to continue to develop my paper craft skills in order to adapt to a new paper cutting technique. Overall, the task has allowed me to interpret research activity to develop ideas and creative proposals for “Unit 8 Structures”. Finally, the task has allowed me to demonstrate the ability to plan, organise and develop ideas for “Unit 8 Structures”.

To start the task, I collected my primary research photograph of a greenhouse which was taken from the Yorkshire Sculpture. I decided to use this image because I believe that the outcome would be effective as it has a variety of elements that build the image together. This includes a variety of plants grown within the greenhouse but also the architecture of the building which I believed would be effective to work into. Also, I decided to use this image because it relates to my theme “structure of nature” which will be combined together with “structure of paper” to create and develop my final piece.  Finally, I decided to use this image because I believe that it will inspire me to create my intimal ideas for my final piece which will be developed further in my project. To print my image I decided to enlarge the size to A3 as I believe that I will capture further detail when cutting into the surface and create a more effective paper-cutting piece. Also, I decided to enlarge the image as I believe that it would have a better outcome when suspended on the wooden shelf to create a 3D paper-cutting scene. To create the effect I was wanting to achieve, I printed the image 3 times in order to create a background and layers within my wooden shelf. Next, I placed my images onto white card which allowed the pieces to be more sustainable when suspended onto the wooden shelf. For my shelf, it was created from recycled wood and placed onto my wall space in the studio. For the measurements, I decided the length to be 60cm and include 3 separate sections of the shelf to suspend my work. The distance between each 3 different sections was 15cm because I wanted to work within a smaller scale but also allow me to explore the effect I am wanting to create. By creating this shelf, it has allowed me to explore measurements and also explore a unique method of presenting my work which will be developed further into my final project. After I placed my shelf into my studio practise workspace, I continued to work into my paper scene by cutting out elements to build up the layout. For the piece to have an effective outcome, I decided not to work into the background as it is my original photograph which will start to build up the scene towards the foreground within the shelf. For my first foreground layer, I decided to cut out the area which included plants and flowers as it would start to build up my paper-cutting piece. I found creating this piece difficult as I was unsure what elements to cut out for the first foreground layer as the scene was a whole image. To solve the problem, I collected a pencil and marked out the foreground area within the image which identified how I was going to create the scene. Next I focused on my second layer of the piece, which was the greenhouse architecture within the image. I decided to cut into the architecture shapes as I believe it related to how windows are transparent which will allow the person who is observing the piece to look further into my scene to analyse how it has been created. When working into my piece, I found cutting into card and photocopies of my work challenging as I would damage elements of the piece and surfaces when cutting out my design. To improve next time I would change how I placed my primary images onto the surface through exploring different paper printing techniques and methods. After creating my layouts for my piece, I placed them onto my shelf so that they would be ready to be displayed. A problem I faced when placing my work onto the material was that it was difficult to connect both materials together with string. However, to solve the problem, I collected thick pieces of string, which were similar to rope, to connect my work together. The material was effective as it was strong and easy to tie together within the piece. The string was not transparent which made the overall piece less effective as you could see how the elements are placed together to create the scene. To improve next time, I am going to explore further methods of placing my work onto the shelf in further detail and also experimenting with transparent materials such as fishing wire and fuse wire.

Once I placed the elements together, I filmed the appearance of the piece at different angles. I am really happy with my outcome because the piece looks unique at different angles but also giving the 3D appearance I was wanting to achieve. I found the overall outcome effective as it presented my research and combined both “structure of nature” and “paper structures” together. I found this element most effective and I will continue to develop this technique in further detail for my final project. Next I am going to develop initial ideas for my own paper-cutting piece that explores the “structure of nature”.
Video Link- https://www.youtube.com/watch?v=HvsWS0X9cgw


Tuesday 10 May 2016

Creating 3D Paper


I decided to experiment paper in further detail by exploring how it can be moulded and shaped to create 3D pieces. This technique uses the same process as creating paper but also includes placing the pieces around objects to create 3D paper models. I have previous knowledge and techniques from creating 3D paper in past projects which made me excited to develop my skills further for “Unit 8 Structures”. I have decided to explore creating 3D paper as it could be an element that I can explore further into my project and design ideas for my final piece. Also, I have decided to explore creating 3D paper as I wanted to demonstrate how the material can be used to creative effective models and pieces. Finally, I have decided to explore this technique as it relates back to the theme I am exploring for “Unit 8” which is “Paper Structures”. The task allowed me to develop my previous knowledge of the techniques I have learnt and develop them into my project. Also, the task has allowed me to continue to explore and experiment with paper surfaces and also develop them in order to relate to my project. By completing this task, it has allowed me to demonstrate the ability to plan, organise and develop ideas for my project through exploring the process of 3D paper making.


To start the task, I placed shredded the material newspaper and left it to soak overnight in water. I have decided to use the material “newspaper” to create my 3D paper as I believe that is a strong material which is suitable to create moulded pieces. Also, I have decided to use this material as I have previous knowledge of newspaper being used within Paper Mache to create 3D pieces which relates back to my original process I am wanting to complete. To collect the material from the bucket, I used a sieve to combine all the pieces together to create paper. Next, I used a sponge to remove excess water within the material which would be ready to be placed onto my mould. I decided to use balloons for my object to create mould as I have previous experience with using this method and I believe that it had an effective outcome. Also, I have decided to use balloons as they have an even surface which allowed me to place the materials together easily to create one piece. Once, I removed the excess water I started to place my material onto the balloon.  A problem I faced when placing the paper was that the balloon could move very easily which caused pieces to fall off the shape. However, to solve the problem I placed the balloons onto a stand to avoid the objects moving when paper is placed onto them. I repeated the paper making process several times in order to create a mould around the balloon shape. Another problem I faced was that I didn’t have enough material to cover the whole object. To improve next time, I will collect further newspaper pieces and place them into water. After creating the 3D mould I allowed the object to dry naturally which took a day to create. Once the piece was dry, I removed the balloon to reveal the 3D mould that was placed around the shape. Overall, I believe that it wasn’t effective as it was small samples which made the overall appearance look not 3D. However, the pieces did demonstrate some 3D effect as the paper moulds has a small curve which created a bowl shape outcome. To improve the task next time, I will create more paper to be placed onto my object which will create an effective outcome.

21st April Exploring Paper Surfaces


On Thursday 21st of April, I continued to explore the technique of paper cutting through experimenting with different surfaces of card and paper. This was continued on the same development I used previously and I achieved a full A3 Sheet filled with a variety of paper surfaces in the studio practise time I was given. Also, I continued to use the same design pattern previously, which related back to my theme of the “structure of nature” and elements within the topic which are also built up in individual structures. The design was inspired by my primary research and it was developed further into my project which allowed me to create my own individual patterns and “structures of nature”. The task allowed me to continue to develop my paper craft skills and adapt them to new individual paper surfaces that I have never explored before. By exploring paper surfaces, it has allowed me to analyse each individual surface and identify which is piece is the most suitable to develop further for my project. Also, exploring paper surfaces it has inspired me to generate ideas for my final project and collect inspiration from my paper craft skills. Finally, the studio practise has allowed me to demonstrate the ability to plan, organise and develop ideas for my final project “Unit 8 Structures”. To start the task, I collected my development sheet board and my tracing paper which included my original design pattern for the paper surfaces. I continued to use the same measurements for the paper sizes which allowed them to be equal and I used the same pattern throughout the task in order to make the sheet fair and equal to analyse them overall. This would allowed me to analyse the surface, paper patterns individually but overall as a whole development sheet.

Firstly, I decided to explore the material “wallpaper” which included a nature theme pattern on the surface of the design. A problem I faced when transferring my design was that the wallpaper wasn’t effective and didn’t show the pattern on the surface effectively. To solve the problem, I continue to transfer the design continually until it revealed a light pencil outline on the surface. When I started to work into the surface with my craft knife I found it difficult to reach the small details within the pattern which caused damage to the overall outcome. The final outcome wasn’t effective as my craft knife couldn’t create a neat finish which led to rough design outline. However, the wallpaper design did create large paper-cutting pieces which presented part of my original design. Next, I explored homemade paper which is made up of recycled paper that has been joined together through water. I was curious to explore this material as it has an uneven texture which is made up of a variety of paper surfaces. Transferring my design onto the surface was very effective but cutting out my pattern was difficult to create. A problem I faced when cutting out my design was that large pieces of the homemade paper were falling apart whilst I was working into it which damaged the overall design. Also, another problem I faced with homemade paper was that I couldn’t create straight, clean outlines which made the outcome look uneven and rough within the texture of the paper. Finally, another problem I faced was that I couldn’t achieve the small details within my design which changed the overall appearance.

Finally for my development sheet, I explored fabric card that was a soft material which I have used previously in my project. From my previous knowledge, I found cutting shapes from the card difficult to create as it is a strong material. However, I wanted to continue to develop my skills and I transferred my design onto the surface. Whilst I was cutting into the surface I noticed that I had to repeat my craft knife cutting 3 times in order for the piece to be removed from the design. This allowed me to cut out the design accurately but it sadly left a rough finish around the edges of my work. Overall, I found it difficult working with this piece as the process took longer which wouldn't be suitable for my final piece and time management for my project. Next I placed all of my paper surfaces onto the sheet and I decided to decorate the background because I found the appearance simple. To relate it back to my board, I placed recycled pieces together to create a collage on my sheet which made the overall piece more engaging and eye-catching. For my annotation I am going to be writing on the sheet but also on paper tags that have been placed onto design which looked effective and related back to my board.


 The most effective paper surface that I am going to develop for my final piece is the material card. I have decided to use this material because it allows me to cut safely and neatly into the surface which makes the overall outcome look neat around the edges of my design. Also, I have chosen this material because I could include small intricate designs that would be cut effectively and create an engaging structure. Card also comes in a variety of colours which will be suitable when I am developing further into my project. I found parcel paper also effective for cutting and creating neat pieces. However, it only comes in one colour which wouldn't be effective for my final project as I am wanting to create an engaging final piece which will present all of my skills I have learnt from the process. Finally, I have decided to use card as I felt most confident with this material and I believe that I can develop it further into my project to create and effective final piece.

Monday 2 May 2016

19th April Exploring Paper Surfaces


On Tuesday 19th of April, I started to explore a variety of paper surfaces and card through the technique of paper cutting. This was explored through a development sheet where I experimented with 6 different types of paper and card which had the same design layout on each surface. The task allowed me to adapt my paper craft skills and techniques to each individual surface. Also, the task allowed me to experiment with different surfaces and identify which material is the most suitable for paper cutting that will be developed further into my project. By exploring a variety of materials it has allowed me to analyse which surface would be most effective for what I am wanting to achieve for my final project piece. The task has allowed me combine both of my elements for my project through creating a detailed layout that has been inspired by the “Structure Of Nature”. Finally, the task has allowed me to develop my skills with using a new craft knife tool and gain confidence with cutting small details within my design layout. By exploring a variety of paper materials, it has allowed me to interpret research activities to develop ideas. Also, it has allowed me to demonstrate the ability to plan, organise and develop ideas for “Unit 8 Structures”.

For my layout, I created an A2 board and placed a watercolour wash on the surface of my sheet which made it colourful and engaging. I decided to use watercolours as they create a light surface which would continue to emphasise the paper materials on the sheet but also make it colourful. For my design, I wanted a detailed layout which related to my other element of structure that is “nature”. I decided to make my design detailed as it would test each individual surface better and it would allow me to develop my paper-cutting skills further. For my design I gained inspiration from a specific plant photograph that I took for my primary research. After creating my design, I collected the paper materials and used tracing paper to copy my design onto each individual surface. I decided to use the same design layout to present which material is the most effective on the paper surfaces.

Firstly, I decided to experiment with the material parcel paper which has a delicate surface. I was curious to explore with this material as I have never previously explored this paper surface for paper-cutting. The surface worked really well as I could achieve small details within the design without damaging the overall piece. However, I did noticed that the paper ripped very easily which was difficult to use when cutting the design surface out. Once I created this piece, I focused with using the material card. I have previous experience with using card, so I felt confident when working into the material and design layout. I believe that card is one of the most effective materials for paper-cutting as you can cut into the surface easily but continues to be strong which avoids damaging different elements within the overall piece. The overall outcome of the design was effective as I could achieve small details with a neat finish to my outline. Finally, I experimented with the material corrugated card which I have never previously used for paper-cutting before. I didn’t feel confident with using this material because it has an uneven surface which I believed would affect the overall outcome of my design. Corrugated card wasn’t effective for paper-cutting as I couldn’t achieve small details of the design which lead to the overall design looking different from my original idea. Also, the material wasn’t effective as it damaged very easily when using the craft knife which lead to the overall outline looking uneven and untidy.


Next, I am going to complete my development sheet for paper surfaces and continue to explore and experiment with different materials which include wallpaper, homemade paper and fabric card.

Secondary Research


For my secondary research, I decided create boards within my Pinterest page which explored my ideas and knowledge for my final project “Unit 8 Structures”. The boards included researching the themes for my project “structure of nature” and “paper structures”. Also, the boards included elements within my themes that I am wanting to explore and develop further into my project and final design. By completing secondary research through Pinterest it has allowed me to gain inspiration from a variety of “paper structures” to develop further into my project and also explore which paper crafts and methods are the most effective for the combination of my themes. Also, by completing secondary research through Pinterest it has allowed me to develop my ideas through exploring into specific elements of my theme and combining them together to demonstrate my thought process and ideas. By combining all the secondary research together, it has allowed me to present the variety of research I have collected for the project and which elements I will be developing further into my project. The Pinterest board presents my initial ideas at the start of the project and my development and interpretation of the theme. I found collecting secondary research from Pinterest useful as it has allowed me to develop my confidence through the project theme but also allow me to generate ideas and designs which will be developed further into my project. By completing secondary research, it has allowed me to analyse a research source to support my finl project “Unit 8 Structures”.
The link to my Pinterest Board- https://uk.pinterest.com/Ellieartstudent/

Creating Paper


For my project “Unit 8 Structures”, I decided to create homemade paper which is a process that uses recycled pieces of paper to create new surfaces that can be drawn and cut through within the surface. The process allows me to explore a variety of different papers and surfaces which is useful for my project as I will be using the material for my final piece. By creating paper, it allows me to identify which surface is most effective to work into and can be taken further and developed through my project.  Also, by creating paper, it also allows me to identify visually which pieces are most suitable through surface and colour for my development of my final project. By completing this task, it has allowed me to interpret research activity to develop ideas and creative proposals. Finally, by completing this task, it has allowed me to demonstrate the ability to plan, organise and develop ideas for my project through exploring the process of paper-making and identifying what elements would be suitable for my project.
Firstly, I collected a variety of different paper surfaces and placed them into a shredder individually, to break down the elements of the material. When using the shredder, I have followed health and safety instructions throughout the process. Firstly, I tied my hair up to avoid the risk of it getting caught in the machine. Also, I removed any pieces of metal, such as paper clips, to avoid the machine being damaged when placing paper through it. All these instructions were followed throughout the task. Once the paper went through the machine, I placed the materials into a bucket of warm water and left it to soak overnight which allowed the pieces to soften. After I left the materials to soak overnight, I collected the equipment that I needed to create my paper. The equipment included a sponge, sieve and cloth. Firstly, I broke the pieces of paper further down in my bucket which allowed the water to soak further into the material. Next, I collected my sieve and collected the material within the bucket into the piece of equipment. I found completing this task challenging as I couldn’t collect enough material to create paper. However, I overcame this problem and developed my confidence with the process when I repeated the technique for different paper surfaces. After collecting the paper, I used a sponge to remove excess water within the sieve that was combing the material together to create paper. Next, I placed my piece of paper onto a cloth and continued to remove excess water within the material which would allow the piece to dry quicker but also make it more effective. Finally, I placed several pieces of cloth onto the homemade paper to allow the piece to dry naturally but also quickly. This process was repeated to experiment with different paper surfaces and textures for my project. As I completed a variety of different paper surfaces, it has allowed me to develop my confidence with using this technique and the equipment I have used.


14th April "Rob Ryan" And "Helen Musselwhite

On Thursday 14th of April, I continued to explore and complete contextual study pages for “Unit 8 Structures”. All of the studies were completed in my sketchbook and I explored the works of Helen Musselwhite and I continued to explore the works of Rob Ryan. Both of these artists create contemporary paper art and cutting pieces and I was going to experiment and explore how these are created in detail throughout my sketchbook. The task allowed me to gain inspiration and ideas that will be developed further throughout my project. Also, the task allowed me to develop my paper craft skills to adapt to the specific styles of work that both artists present.  The task allowed me to generate ideas throughout the elements of “structure” that I am going to combine as Helen Musselwhite’s work has a theme of nature which I am curious to explore in detail. Finally, the studio practise, has allowed me to develop further knowledge of Rob Ryan’s work and how he creates the intricate pieces. The studio practise has allowed me to analyse an element within a range of research sources to support “Unit 8 Structures”.

To start the task I collected images from my contextual research and placed them into my sketchbook for “Rob Ryan”. I wanted to create a collage of Rob Ryan’s work because I wanted to present how I have developed my knowledge and understanding to transcribe his work through my paper craft skills. Also, I wanted to create a collage of his work because I wanted to express how all of his pieces of work are detailed and intricate which will be developed into my interpretation and the overall project. To relate to Rob Ryan’s work, I wanted to make the layout simple which will highlight his pieces of work, so I decided to keep the background white and create a stencil of his name. I problem I faced was when I created the stencil, it wasn’t effective as it couldn’t be seen above the page behind the sketchbook. To solve the problem, I placed coloured card underneath the lettering which made it effective and stand out on the surface. After creating the title, I focused on creating a background which emphasised Rob Ryan’s style of work. From observing and analysing his pieces, I recognized that he had some detailed borders around his work. I developed his idea and created a border around my sketchbook page which allowed me to adapt my paper craft skills to suit the artist’s style of work. Whilst creating the border, I found it difficult to create small intricate pieces within the design. However, I overcame the problem and gained confidence throughout the process which will be developed throughout my project. Once I completed the border, I decided to focus on themes that Rob Ryan places within his work. I recognized that Rob Ryan creates a variety of nature pieces so I decided to make paper cut-outs of flowers and birds. I found creating these elements useful because it related to the other element of structure (nature) that I am focusing throughout my project which will be combined with paper crafts. After creating these elements, I placed them onto the sketchbook and decided to focus on creating a sketchbook page based around the works of Helen Mussellwhite.

For the background of my sketchbook page, I gained inspiration from observing Helens work and created a basic colourful background which was made my acrylic paint. I wanted the page to have a neat finish and this was a problem I faced when using acrylic paint. I noticed that when I painted the backgrounds for the first time, I could see the white background in some areas. To solve the problem I created a couple of layers of paint on the surface which allowed the piece to be neat and ready to be used for the page. Whilst the page were drying, I decided to create the elements for my contextual study page. For my first page, I wanted to create a specific large scale piece of Helens work to emphasise the detail and elements within the layout. This allowed me to experiment with creating small intricate paper crafts pieces and also develop my knowledge and skills of creating these elements. I created the “owl” features and parts individually and combined them all together to create the layout. I enjoyed creating these features because it allowed me to explore working with card in further detail and combine a variety of bright card surfaces together. When observing Helens work, I noticed that she included further facial features within the characters. To create these features, I collected fine pens and highlighted all the specific details onto the surface of my characters. Once I created these specific characters, I continued to develop my paper craft skills and create a large scale paper tree which was transcribed from the original piece of work. Then I combined all of these elements together and placed them into my sketchbook to create the large Helen Musselwhite piece.


Next, I am going to continue creating the large scale piece of Helen Musselwhite and complete the overall sketchbook page about her work.